在本文中,我们将使用基于分布式存储的 Kubernetes 部署来构建一个 IRIS 的高可用配置,而不使用“传统的”IRIS Mirror。 这种部署将能够容忍与基础架构相关的故障,如节点、存储和可用区故障。 所描述的方法可以大大降低部署的复杂性,代价是 RTO的略微延长。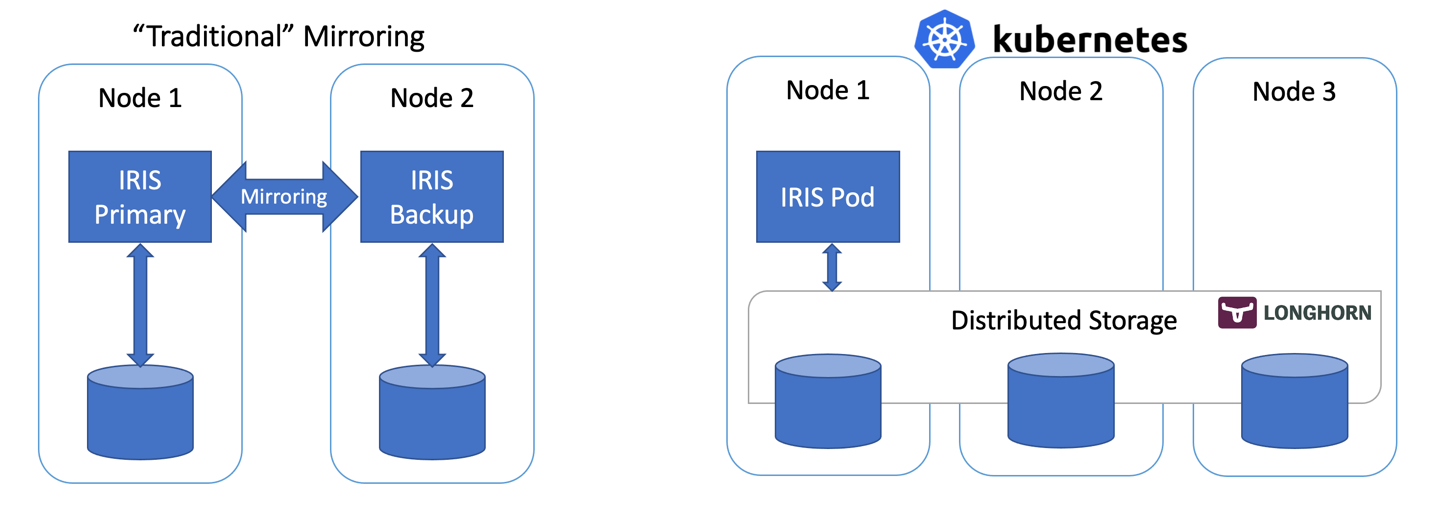 图 1 - 传统镜像与采用分布式存储的 Kubernetes
假设您有一个正在运行的 3 节点集群,并且您对 Kubernetes 有一定了解 – 请继续:
kubectl apply -f https://raw.githubusercontent.com/longhorn/longhorn/master/deploy/longhorn.yaml
kubectl apply -f https://github.com/antonum/ha-iris-k8s/raw/main/tldr.yaml
如果您不确定上面两行有什么作用,或者没有可执行这些命令的系统,请跳转至“高可用性要求”部分。 我们将在后面详细介绍。
第一行安装 Longhorn - 开源分布式 Kubernetes 存储。 第二行安装 InterSystems IRIS ,将基于 Longhorn 的卷用于 Durable SYS。
等待所有 pod 进入运行状态。 kubectl get pods -A
您现在应该能通过 http://<IRIS Service Public IP>:52773/csp/sys/%25CSP.Portal.Home.zen(默认密码为“SYS”)访问 IRIS 管理门户,并通过以下命令访问 IRIS 命令行:
kubectl exec -it iris-podName-xxxx -- iris session iris
模拟故障
现在开始制造一些混乱。 但在操作之前,先尝试将一些数据添加到数据库中,并确保当 IRIS 重新上线后数据仍然存在。
kubectl exec -it iris-6d8896d584-8lzn5 -- iris session iris
USER>set ^k8stest($i(^k8stest))=$zdt($h)_" running on "_$system.INetInfo.LocalHostName()
USER>zw ^k8stest
^k8stest=1
^k8stest(1)="01/14/2021 14:13:19 running on iris-6d8896d584-8lzn5"
我们的“混乱工程”从这里开始:
# Stop IRIS - Container will be restarted automatically
kubectl exec -it iris-6d8896d584-8lzn5 -- iris stop iris quietly

# Delete the pod - Pod will be recreated
kubectl delete pod iris-6d8896d584-8lzn5

# "Force drain" the node, serving the iris pod - Pod would be recreated on another node
kubectl drain aks-agentpool-29845772-vmss000001 --delete-local-data --ignore-daemonsets --force

# Delete the node - Pod would be recreated on another node
# well... you can't really do it with kubectl. Find that instance or VM and KILL it.
# if you have access to the machine - turn off the power or disconnect the network cable. Seriously!
高可用性要求
我们正在构建可以容忍以下故障的系统:
- 容器/VM 内的 IRIS 实例。 IRIS – 级别故障。
- pod/容器故障。
- 个别集群节点暂时不可用。 一个典型的例子是可用区临时下线。
- 个别集群节点或磁盘的永久性故障。
基本上,是我们刚才在“模拟故障”部分中尝试实现的场景。
如果发生上述任何一种故障,系统应该在没有任何人工干预的情况下保持在线,并且没有数据丢失。 从技术上说,数据持久性的保证是有限制的。 IRIS 本身可以根据应用程序内的日志循环和事务使用情况提供:https://docs.intersystems.com/irisforhealthlatest/csp/docbook/Doc.View.cls?KEY=GCDI_journal#GCDI_journal_writecycle。无论如何,我们讨论的是低于两秒的 RPO(恢复目标时间)。
系统的其他组件(Kubernetes API 服务、etcd 数据库、LoadBalancer 服务、DNS 等等)不在讨论范围内,它们通常由 Azure AKS 或 AWS EKS 等托管 Kubernetes 服务管理,因此我们假定它们已经高度可用。
换一个角度看 – 我们负责处理个别的计算和存储组件故障,并假设其余故障由基础设施/云提供商处理。
架构
在谈到 InterSystems IRIS 的高可用性时,传统的建议是使用镜像。 使用镜像时,有两个始终在线的 IRIS 实例同步复制数据。 每个节点都维护一个完整的数据库副本,如果主节点宕机,用户将重新连接到备份节点。 本质上,在镜像方法中,IRIS 负责计算和存储的冗余。
利用部署在不同可用区的Mirror,镜像方法提供了容忍计算和存储故障所需的冗余,并且实现了只有几秒的出色 RTO(目标恢复时间或系统在故障后重新上线所需的时间)。 您可以在以下网址找到在 AWS 云上部署 IRIS Mirror的模板:https://community.intersystems.com/post/intersystems-iris-deployment%C2%A0guide-aws%C2%A0using-cloudformation-template
Mirror的缺点是设置、执行备份/恢复程序比较复杂,而且缺少对安全设置和本地非数据库文件的复制。
Kubernetes 等容器编排器通过部署对象提供计算冗余,在出现故障时会自动重启有故障的 IRIS Pod/容器。 所以在 Kubernetes 架构图上只能看到一个 IRIS 节点在运行。 我们没有让另一个 IRIS 节点始终保持运行,而是将计算可用性外包给 Kubernetes。 Kubernetes 将确保当原始 pod 因任何原因发生故障时,重新创建 IRIS pod。
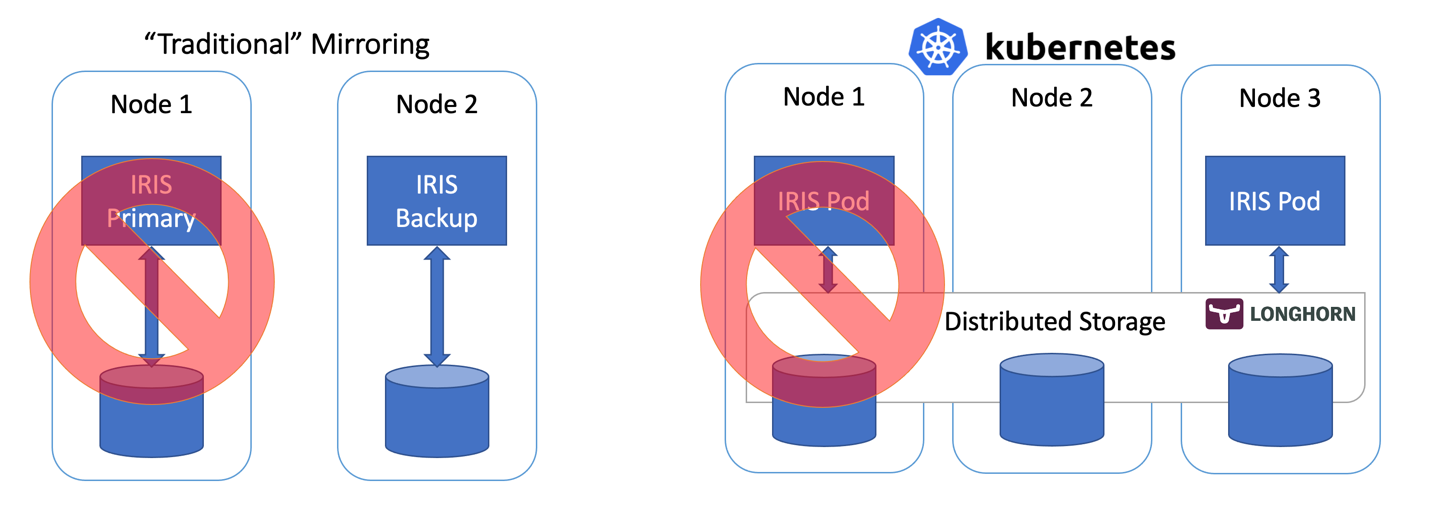
图 2 故障转移方案
到目前为止还不错... 如果 IRIS 节点发生故障,Kubernetes 就会创建一个新节点。 根据集群的情况,发生计算故障后,让 IRIS 重新上线需要 10 到 90 秒的时间。 相对于Mirror只需要几秒即可恢复,这确实有些退步,但如果万一发生中断时您可以容忍这一点,那么回报就是复杂度大大降低。 无需配置镜像。 无需担心安全设置和文件复制。
说实话,如果您在容器内登录,在 Kubernetes 中运行 IRIS,您甚至不会注意到您正在高可用环境中运行。 一切都像单实例 IRIS 部署一样。
等等,那存储呢? 我们还要处理数据库... 无论我们想象到什么样的故障转移方案,我们的系统都应该确保数据持久性。 Mirror依赖于 IRIS 节点本地的计算。 如果节点故障或只是暂时不可用 – 该节点的存储也会变得如此。 这就是IRIS 需要在Mirror配置内解决 IRIS 层面的数据复制的原因。
我们需要的存储不仅能在容器重启后保留数据库的状态,而且能针对节点或整个网段(可用区)宕机等事件提供冗余。 就在几年前,这个问题还没有简单的答案。 不过从上图可以猜到 – 我们现在有了这样的答案。 它称为分布式容器存储。
分布式存储将多个基础主机卷抽象成一个联合存储,供 k8s 集群的每个节点使用。 在本文中,我们使用 Longhorn https://longhorn.io;它免费、开源且相当容易安装。 但是您也可以看看其他提供相同功能的产品,例如 OpenEBS、Portworx 和 StorageOS。 Rook Ceph 是另一个可以考虑的 CNCF 孵化项目。 在高端领域 – 有企业级存储解决方案,如 NetApp、PureStorage 等。
分步指南
在 TL;DR 部分中,我们一次性安装了整套系统。 附录 B 将指导您完成逐步安装和验证过程。
Kubernetes 存储
让我们往回退一步,从总体上谈谈容器和存储,以及 IRIS 如何融入其中。
默认情况下,容器内的所有数据都是暂时的。 当容器消亡时,数据也会消失。 在 docker 中,可以使用卷的概念。 本质上,它允许将主机操作系统上的目录公开给容器。
docker run --detach
  --publish 52773:52773
  --volume /data/dur:/dur
  --env ISC_DATA_DIRECTORY=/dur/iconfig
  --name iris21 --init intersystems/iris:2020.3.0.221.0
在上面的示例中,我们启动了 IRIS 容器,并使主机本地的“/data/dur”目录可以被“/dur”挂载点上的容器访问。 所以,容器在该目录内存储的任何内容都会保留下来,并可在下次容器启动时使用。
在 IRIS 方面,我们可以通过指定 ISC_DATA_DIRECTORY 来指示 IRIS 将所有需要在容器重启后存活的数据存储在特定目录中。 Durable SYS 是您可能需要在文档 https://docs.intersystems.com/irisforhealthlatest/csp/docbook/Doc.View.cls?KEY=ADOCK#ADOCK_iris_durable_running 中查找的 IRIS 功能的名称
在 Kubernetes 中,语法有所不同,但概念是相同的。
以下是 IRIS 的基本 Kubernetes 部署。
apiVersion: apps/v1
kind: Deployment
metadata:
  name: iris
spec:
  selector:
    matchLabels:
      app: iris
  strategy:
    type: Recreate
  replicas: 1
  template:
    metadata:
      labels:
        app: iris
    spec:
      containers:
      - image: store/intersystems/iris-community:2020.4.0.524.0
        name: iris
        env:
        - name: ISC_DATA_DIRECTORY
          value: /external/iris
        ports:
        - containerPort: 52773
          name: smp-http
        volumeMounts:
        - name: iris-external-sys
          mountPath: /external
      volumes:
      - name: iris-external-sys
        persistentVolumeClaim:
          claimName: iris-pvc
在上面的部署规范中,“volumes”部分列出了存储卷。 可以在容器外部通过“iris-pvc”等 persistentVolumeClaim 访问它们。 volumeMounts 在容器内公开了此卷。 “iris-external-sys”是将卷挂载绑定到特定卷的标识符。 在现实中,我们可能有多个卷,此名称即用来区分各个卷。 如果您愿意,还可以叫它“steve”。
我们已经熟悉的环境变量 ISC_DATA_DIRECTORY 指示 IRIS 使用一个特定挂载点来存储所有需要在容器重启后存活的数据。
现在,我们来看一下持久卷声明 iris-pvc。
apiVersion: v1
kind: PersistentVolumeClaim
metadata:
  name: iris-pvc
spec:
  storageClassName: longhorn
  accessModes:
    - ReadWriteOnce
  resources:
    requests:
      storage: 10Gi
相当直接。 请求 10 GB,只能在一个节点上以读/写方式挂载,使用“longhorn”存储类。
storageClassName: longhorn 在这里实际上很关键。
我们看一下我的 AKS 集群上可用的存储类:
kubectl get StorageClass
NAME                             PROVISIONER                     RECLAIMPOLICY   VOLUMEBINDINGMODE   ALLOWVOLUMEEXPANSION   AGE
azurefile                        kubernetes.io/azure-file        Delete          Immediate           true                   10d
azurefile-premium                kubernetes.io/azure-file        Delete          Immediate           true                   10d
default (default)                kubernetes.io/azure-disk        Delete          Immediate           true                   10d
longhorn                         driver.longhorn.io              Delete          Immediate           true                   10d
managed-premium                  kubernetes.io/azure-disk        Delete          Immediate           true                   10d
默认安装了 Azure 的几个存储类,还有一个来自于 Longhorn,是我们在第一个命令中安装的:
kubectl apply -f https://raw.githubusercontent.com/longhorn/longhorn/master/deploy/longhorn.yaml
如果在持久卷声明定义中注释掉 #storageClassName: longhorn,则将使用当前标记为“default”的存储类,它是一个常规 Azure 磁盘。
为了说明为什么需要分布式存储,让我们重复本文开头所述的没有 longhorn 存储的“混乱工程”实验。 前两种情况(停止 IRIS 和 删除 Pod)将成功完成,系统将恢复到运行状态。 尝试耗尽或终止节点将使系统进入故障状态。
#forcefully drain the node
kubectl drain aks-agentpool-71521505-vmss000001 --delete-local-data --ignore-daemonsets

kubectl describe pods
...
  Type     Reason            Age                  From               Message
  ----     ------            ----                 ----               -------
  Warning  FailedScheduling  57s (x9 over 2m41s)  default-scheduler  0/3 nodes are available: 1 node(s) were unschedulable, 2 node(s) had volume node affinity conflict.
基本上,Kubernetes 会尝试重启集群上的 IRIS pod,但最初启动该 pod 的节点不可用,另外两个节点存在“卷节点相关性冲突”。 对于这种存储类型,卷只在最初创建它的节点上可用,因为它基本上与节点主机上可用的磁盘绑定。
使用 longhorn 作为存储类时,“强制耗尽”和“节点终止”实验均会成功,并且 IRIS pod 很快会恢复运行。 为了实现这一目标,Longhorn 控制了集群的 3 个节点上的可用存储,并将数据复制到全部三个节点上。 如果其中一个节点永久不可用,Longhorn 会迅速修复集群存储。 在我们的“节点终止”场景中,系统立即使用其余的两个卷副本在其他节点上重启 IRIS pod。 然后,AKS 提供一个新节点来替换丢失的节点,一旦准备就绪,Longhorn 就会介入,并在新节点上重建所需数据。 一切都是自动的,不需要您参与。
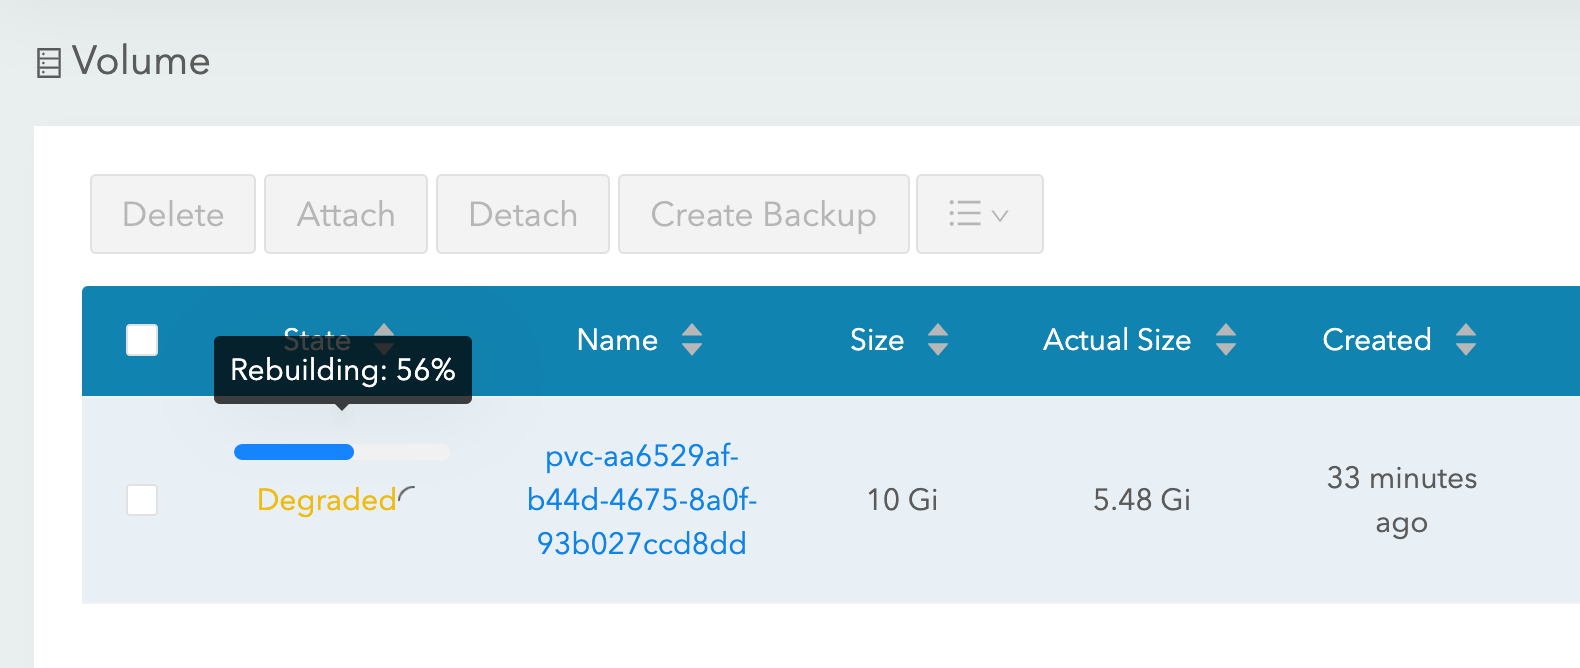
图 3 Longhorn 在替换的节点上重建卷副本。
更多有关 k8s 部署的信息
我们看一下部署的其他几个方面:
apiVersion: apps/v1
kind: Deployment
metadata:
  name: iris
spec:
  selector:
    matchLabels:
      app: iris
  strategy:
    type: Recreate
  replicas: 1
  template:
    metadata:
      labels:
        app: iris
    spec:
      containers:
      - image: store/intersystems/iris-community:2020.4.0.524.0
        name: iris
        env:
        - name: ISC_DATA_DIRECTORY
          value: /external/iris
        - name: ISC_CPF_MERGE_FILE
          value: /external/merge/merge.cpf
        ports:
        - containerPort: 52773
          name: smp-http
        volumeMounts:
        - name: iris-external-sys
          mountPath: /external
        - name: cpf-merge
          mountPath: /external/merge
        livenessProbe:
          initialDelaySeconds: 25
          periodSeconds: 10
          exec:
            command:
            - /bin/sh
            - -c
            - "iris qlist iris | grep running"
      volumes:
      - name: iris-external-sys
        persistentVolumeClaim:
          claimName: iris-pvc
      - name: cpf-merge
        configMap:
          name: iris-cpf-merge
策略: 重建Recreate, 副本replicas: 1 告诉 Kubernetes 在任何给定时间都应该保持一个且只能有一个 IRIS pod 实例运行。 这对应于我们的“删除 pod”场景。
livenessProbe 部分确保 IRIS 始终在容器内正常运行并应对“IRIS 下线”情况。 initialDelaySeconds 允许 IRIS 启动有一定的宽限期。 如果 IRIS 需要相当长的时间来启动部署,您可能需要增加该值。
IRIS 的 CPF MERGE配置文件合并 功能允许您在容器启动时修改配置文件 iris.cpf 的内容。 请参见 https://docs.intersystems.com/irisforhealthlatest/csp/docbook/DocBook.UI.Page.cls?KEY=RACS_cpf#RACS_cpf_edit_merge 了解相关内容。
在本示例中,我将使用 Kubernetes Config Map 管理合并文件 https://github.com/antonum/ha-iris-k8s/blob/main/iris-cpf-merge.yaml 的内容。这里我们调整了 IRIS 实例使用的全局缓冲区和 gmheap 值,但是您在 iris.cpf 文件中找到的一切都是可修改的。 您甚至可以使用 CPF Merge 文件中的“PasswordHash”字段更改默认 IRIS 密码。 更多信息请参见:https://docs.intersystems.com/irisforhealthlatest/csp/docbook/Doc.View.cls?KEY=ADOCK#ADOCK_iris_images_password_auth
除了持久卷声明 https://github.com/antonum/ha-iris-k8s/blob/main/iris-pvc.yaml 部署 https://github.com/antonum/ha-iris-k8s/blob/main/iris-deployment.yaml 和采用 CPF Merge 内容的 ConfigMap https://github.com/antonum/ha-iris-k8s/blob/main/iris-cpf-merge.yaml,我们的部署还需要一个将 IRIS 部署暴露给公网的服务:https://github.com/antonum/ha-iris-k8s/blob/main/iris-svc.yaml
kubectl get svc
NAME         TYPE           CLUSTER-IP    EXTERNAL-IP     PORT(S)           AGE
iris-svc     LoadBalancer   10.0.18.169   40.88.123.45   52773:31589/TCP   3d1h
kubernetes   ClusterIP      10.0.0.1      <none>          443/TCP           10d
iris-svc 的外部 IP 可用于通过 http://40.88.123.45:52773/csp/sys/%25CSP.Portal.Home.zen 访问 IRIS 管理门户。 默认密码为“SYS”。
备份/恢复和存储扩展
Longhorn 提供了基于 Web 的 UI 来配置和管理卷。
使用 kubectl 标识 pod、运行 longhorn-ui 组件和建立端口转发:
kubectl -n longhorn-system get pods
# note the longhorn-ui pod id.

kubectl port-forward longhorn-ui-df95bdf85-gpnjv 9000:8000 -n longhorn-system
Longhorn UI 将可通过 http://localhost:9000 访问

图 4 Longhorn UI
除了高可用性,大多数 Kubernetes 容器存储解决方案还提供了方便的备份、快照和恢复选项。 细节是特定于实现的,但通常的惯例是备份与 VolumeSnapshot 关联。 对于 Longhorn 来说就是这样。 根据您的 Kubernetes 版本和提供商,您可能还需要安装卷快照工具 https://github.com/kubernetes-csi/external-snapshotter
“iris-volume-snapshot.yaml”是此类卷快照的示例。 在使用它之前,您需要在 Longhorn 中配置备份到 S3 存储桶或 NFS 卷。 https://longhorn.io/docs/1.0.1/snapshots-and-backups/backup-and-restore/...
# Take crash-consistent backup of the iris volume
kubectl apply -f iris-volume-snapshot.yaml
对于 IRIS,建议在获取备份/快照之前执行外部冻结,之后再解冻。 有关详细信息,请参见:https://docs.intersystems.com/irisforhealthlatest/csp/documatic/%25CSP.Documatic.cls?LIBRARY=%25SYS&CLASSNAME=Backup.General#ExternalFreeze
要增加 IRIS 卷的大小,请调整 IRIS 使用的持久卷声明(文件“iris-pvc.yaml”)中的存储请求。
...
  resources:
    requests:
      storage: 10Gi #change this value to required
然后,重新应用 pvc 规范。 当卷连接到正在运行的 Pod 时,Longhorn 无法实际应用此更改。 请在部署中暂时将副本数更改为零,以便增加卷大小。
高可用性 – 概述
在文章开头,我们为高可用性设置了一些标准。 下面来说明我们如何通过此架构来实现:
Zoombie和其他要考虑的事项
如果您熟悉在 Docker 容器中运行 IRIS,则可能已经使用了“--init”标志。
docker run --rm -p 52773:52773 --init store/intersystems/iris-community:2020.4.0.524.0
此标志的目标是防止形成“僵尸进程”。 在 Kubernetes 中,可以使用“shareProcessNamespace: true”(安全注意事项适用)或在您自己的容器中使用“tini”。 使用 tini 的 Dockerfile 示例:
FROM iris-community:2020.4.0.524.0
...
# Add Tini
USER root
ENV TINI_VERSION v0.19.0
ADD https://github.com/krallin/tini/releases/download/${TINI_VERSION}/tini /tini
RUN chmod +x /tini
USER irisowner
ENTRYPOINT ["/tini", "--", "/iris-main"]
从 2021 年开始,InterSystems 提供的所有容器映像都默认包括 tini。
您可以通过调整一些参数来进一步减少“强制耗尽节点/终止节点”场景下的故障切换时间。
Longhorn Pod 删除策略 https://longhorn.io/docs/1.1.0/references/settings/#pod-deletion-policy-when-node-is-down 和 kubernetes 基于 taint 的逐出:https://kubernetes.io/docs/concepts/scheduling-eviction/taint-and-toleration/#taint-based-evictions
免责声明
作为 InterSystems 员工,我必须在这里说明:本文使用 Longhorn 作为 Kubernetes 分布式块存储的示例。 InterSystems 不会对个别存储解决方案或产品进行验证或发布官方支持声明。 您需要测试和验证是否有任何特定存储解决方案符合您的需求。
分布式存储与节点本地存储相比,性能特征可能有很大差别。 特别是在写入操作方面,数据必须写入到多个位置才会被认为处于持久状态。 请确保测试您的工作负载,并了解您的 CSI 驱动程序具有的特定行为和选项。
基本上,InterSystems 不会验证和/或认可具体的存储解决方案(如 Longhorn),就像我们不会验证单个硬盘品牌或服务器硬件制造商一样。 我个人认为 Longhorn 很容易使用,而且开发团队在项目的 GitHub 页面上响应迅速且乐于助人。https://github.com/longhorn/longhorn
结论
Kubernetes 生态系统在过去几年有了长足的发展,通过使用分布式块存储解决方案,您现在可以构建一个高可用性配置来维持 IRIS 实例、集群节点甚至是可用区故障。
您可以将计算和存储高可用性外包给 Kubernetes 组件,这样与传统 IRIS 镜像相比,系统的配置和维护都大为简化。 同时,此配置可能无法提供与镜像配置相同的 RTO 和存储级别性能。
在本文中,我们使用 Azure AKS 作为托管的 Kubernetes 和 Longhorn 分布式存储系统,构建了一个高可用性 IRIS 配置。 你可以探索多种替代方案,如 AWS EKS、用于托管 K8s 的 Google Kubernetes Engine、StorageOS、Portworx 和 OpenEBS 作为分布式容器存储,甚至 NetApp、PureStorage、Dell EMC 等企业级存储解决方案。
附录 A. 在云中创建 Kubernetes 集群
来自公共云提供商之一的托管 Kubernetes 服务是创建此设置所需的 k8s 集群的简单方法。 Azure 的 AKS 默认配置可以直接用于本文所述的部署。
创建一个新的 3 节点 AKS 集群。 其他所有设置都保持默认。
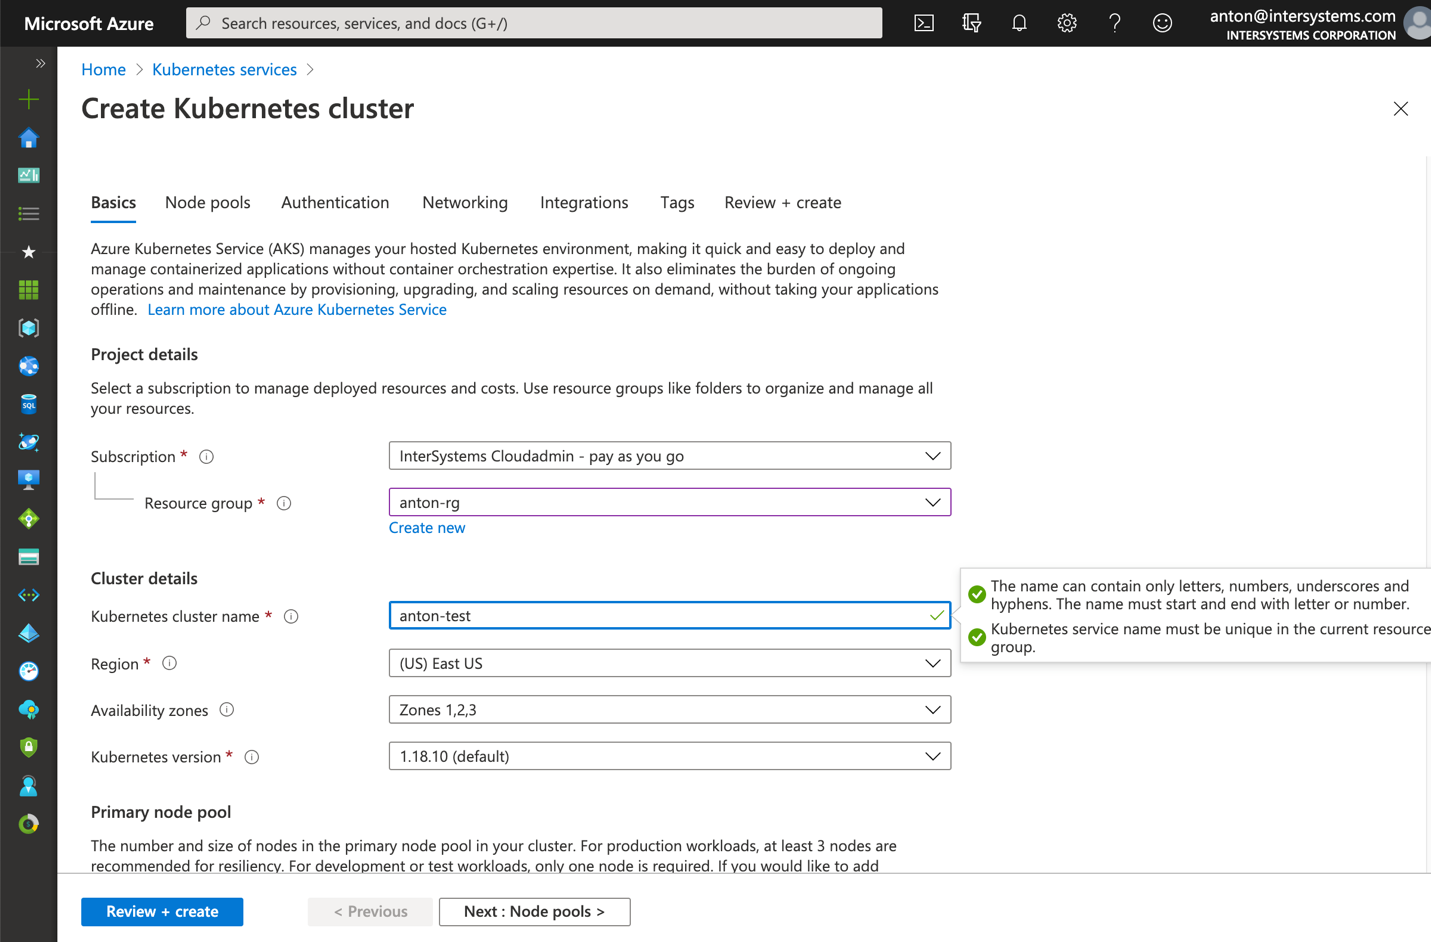
图 5 创建 AKS 集群
在您的计算机上本地安装 kubectl:https://kubernetes.io/docs/tasks/tools/install-kubectl/
使用本地 kubectl 注册 AKS 集群

图 6 使用 kubectl 注册 AKS 集群
之后,您可以回到文章开头,并安装 longhorn 和 IRIS 部署。
在 AWS EKS 上安装更复杂一些。 您需要确保您的节点组中的每个实例都已安装 open-iscsi。
sudo yum install iscsi-initiator-utils -y
在 GKE 上安装 Longhorn 需要额外步骤,请参见此处:https://longhorn.io/docs/1.0.1/advanced-resources/os-distro-specific/csi-on-gke/
附件 B. 分步安装
第 1 步 – Kubernetes 集群和 kubectl
您需要 3 节点 k8s 集群。 附录 A 介绍了如何在 Azure 上获得一个这样的集群。
$ kubectl get nodes
NAME                                STATUS   ROLES   AGE   VERSION
aks-agentpool-29845772-vmss000000   Ready    agent   10d   v1.18.10
aks-agentpool-29845772-vmss000001   Ready    agent   10d   v1.18.10
aks-agentpool-29845772-vmss000002   Ready    agent   10d   v1.18.10
第 2 步 – 安装 Longhorn
kubectl apply -f https://raw.githubusercontent.com/longhorn/longhorn/master/deploy/longhorn.yaml
确保“longhorn-system”命名空间中的所有 pod 都处于运行状态。 这可能需要几分钟。
$ kubectl get pods -n longhorn-system
NAME                                       READY   STATUS    RESTARTS   AGE
csi-attacher-74db7cf6d9-jgdxq              1/1     Running   0          10d
csi-attacher-74db7cf6d9-l99fs              1/1     Running   1          11d
...
longhorn-manager-flljf                     1/1     Running   2          11d
longhorn-manager-x76n2                     1/1     Running   1          11d
longhorn-ui-df95bdf85-gpnjv                1/1     Running   0          11d
有关详细信息和故障排除,请参见 Longhorn 安装指南 https://longhorn.io/docs/1.1.0/deploy/install/install-with-kubectl
第 3 步 – 克隆 GitHub 仓库
$ git clone https://github.com/antonum/ha-iris-k8s.git
$ cd ha-iris-k8s
$ ls
LICENSE                   iris-deployment.yaml      iris-volume-snapshot.yaml
README.md                 iris-pvc.yaml             longhorn-aws-secret.yaml
iris-cpf-merge.yaml       iris-svc.yaml             tldr.yaml
第 4 步 – 逐个部署和验证组件
tldr.yaml 文件将部署所需的所有组件捆绑在一起。 这里我们将逐个进行安装,并单独验证每一个组件的设置。
# If you have previously applied tldr.yaml - delete it.
$ kubectl delete -f https://github.com/antonum/ha-iris-k8s/raw/main/tldr.yaml

# Create Persistent Volume Claim
$ kubectl apply -f iris-pvc.yaml
persistentvolumeclaim/iris-pvc created

$ kubectl get pvc
NAME       STATUS   VOLUME                                     CAPACITY   ACCESS MODES   STORAGECLASS   AGE
iris-pvc   Bound    pvc-fbfaf5cf-7a75-4073-862e-09f8fd190e49   10Gi       RWO            longhorn       10s

# Create Config Map
$ kubectl apply -f iris-cpf-merge.yaml

$ kubectl describe cm iris-cpf-merge
Name:         iris-cpf-merge
Namespace:    default
Labels:       <none>
Annotations:  <none>

Data
====
merge.cpf:
----
[config]
globals=0,0,800,0,0,0
gmheap=256000
Events:  <none>

# create iris deployment
$  kubectl apply -f iris-deployment.yaml
deployment.apps/iris created

$ kubectl get pods
NAME                    READY   STATUS              RESTARTS   AGE
iris-65dcfd9f97-v2rwn   0/1     ContainerCreating   0          11s

# note the pod name. You’ll use it to connect to the pod in the next command

$ kubectl exec -it iris-65dcfd9f97-v2rwn   -- bash

irisowner@iris-65dcfd9f97-v2rwn:~$ iris session iris
Node: iris-65dcfd9f97-v2rwn, Instance: IRIS

USER>w $zv
IRIS for UNIX (Ubuntu Server LTS for x86-64 Containers) 2020.4 (Build 524U) Thu Oct 22 2020 13:04:25 EDT
# h<enter> to exit IRIS shell
# exit<enter> to exit pod

# access the logs of the IRIS container
$ kubectl logs iris-65dcfd9f97-v2rwn
...
[INFO] ...started InterSystems IRIS instance IRIS
01/18/21-23:09:11:312 (1173) 0 [Utility.Event] Private webserver started on 52773
01/18/21-23:09:11:312 (1173) 0 [Utility.Event] Processing Shadows section (this system as shadow)
01/18/21-23:09:11:321 (1173) 0 [Utility.Event] Processing Monitor section
01/18/21-23:09:11:381 (1323) 0 [Utility.Event] Starting TASKMGR
01/18/21-23:09:11:392 (1324) 0 [Utility.Event] [SYSTEM MONITOR] System Monitor started in %SYS
01/18/21-23:09:11:399 (1173) 0 [Utility.Event] Shard license: 0
01/18/21-23:09:11:778 (1162) 0 [Database.SparseDBExpansion] Expanding capacity of sparse database /external/iris/mgr/iristemp/ by 10 MB.

# create iris service
$ kubectl apply -f iris-svc.yaml
service/iris-svc created

$ kubectl get svc
NAME         TYPE           CLUSTER-IP     EXTERNAL-IP    PORT(S)           AGE
iris-svc     LoadBalancer   10.0.214.236   20.62.241.89   52773:30128/TCP   15s
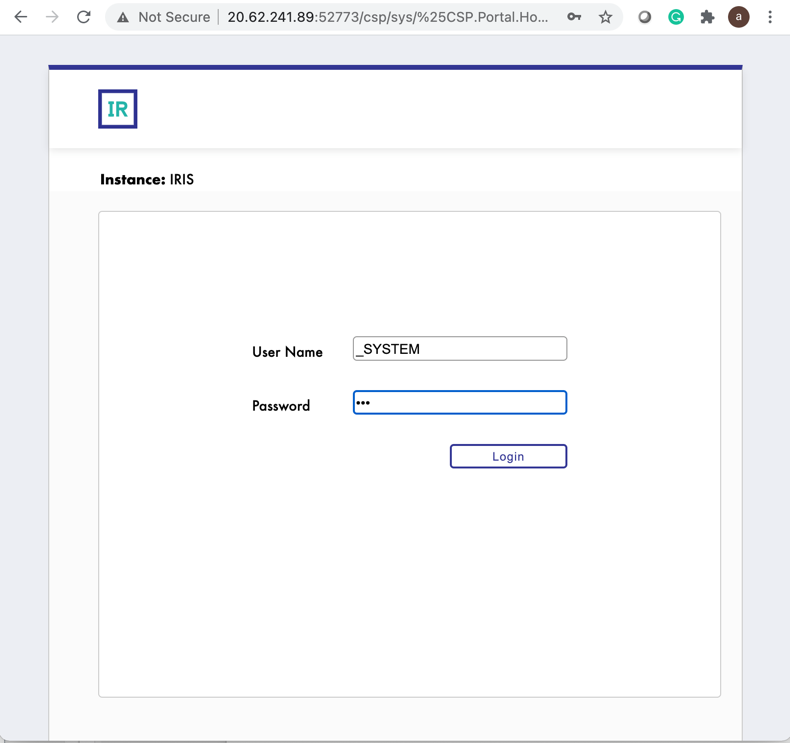
第 5 步 – 访问管理门户
最后使用服务的外部 IP http://20.62.241.89:52773/csp/sys/%25CSP.Portal.Home.zen 连接到 IRIS 的管理门户,用户名 _SYSTEM,密码 SYS。 您第一次登录时将被要求更改密码。
 Open Exchange
.png)