Introduction
Since InterSystems has recently announced the discontinuation of support for InterSystems Studio starting from version 2023.2 in favor of exclusive development of extensions for the Visual Studio Code (VSC) IDE, believing that the latter offers a superior experience compared to Studio, many of us developers have switched or are beginning to use VSC. Many may have wondered how to open the Terminal to perform operations, as VSC does not have an Output panel like Studio did, nor an integrated feature to open the IRIS terminal, except by downloading the plugins developed by InterSystems.
Summary
- Introduction
- Solutions
- For Users with at least IRIS 2020.1 or IRIS IRIS 2021.1.2 – Use Web Terminal
- For Users with at least IRIS 2023.2 – Use WebSocket Terminal
- For Users with Docker-based IRIS
- For users with IRIS Versions Prior to 2023.2 working on their local machine
- For Users Coding on IRIS based on a remote server using an SSH connection
Solutions
There are various ways to open the Terminal in VSC, depending on the specific configuration you are using, I've summarized here the best solutions for any situation:
For Users with at least IRIS 2020.1.1 or IRIS 2021.1.2 – Use Web Terminal
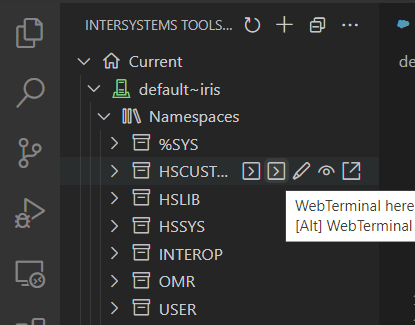
Users that have at least IRIS 2020.1.1 or IRIS 2021.1.2 and that are allowed to install external extensions (somebody may be not due to his company policy about third party applications), might find useful the Web Terminal extension for VSC. For who doesn’t know, the Web Terminal is a web-based terminal for InterSystems products built with ObjectScript (e.g., IRIS, Caché, Ensemble, HealthShare, TrakCare) that allows to use a more advanced version of the Terminal inside the browser (here the project page). This VSC extension enables to launch a web-based terminal directly from VSC, with a simple click.
In order to open the Web Terminal, click on: InterSystems Tools  > select a namespace > click on one of the following icons (
 ,
,  ) to open Web Terminal on VSC terminal panel or on browser (press Alt to change the default icon):

For Users with at least IRIS 2023.2 – Use WebSocket Terminal
Users with at least IRIS 2023.2 can take advantage of the new "WebSocket Terminal" feature included in the latest version of the VSC extensions and they don’t need for additional workarounds.
In order to open the WebSocket Terminal, click on: InterSystems Tools > select a namespace > click on the icon next to the Web Terminal one.

Edit: For further information, check the interesting article @Brett Saviano wrote about it!
How to run ObjectScript commands in the VS Code integrated terminal
For Users with Docker-based IRIS
Those working with IRIS environments within Docker and using VSC can start a terminal session directly within the Docker environment.
Click on the Docker voice in the Status Bar, and then choose Open Terminal in Docker.
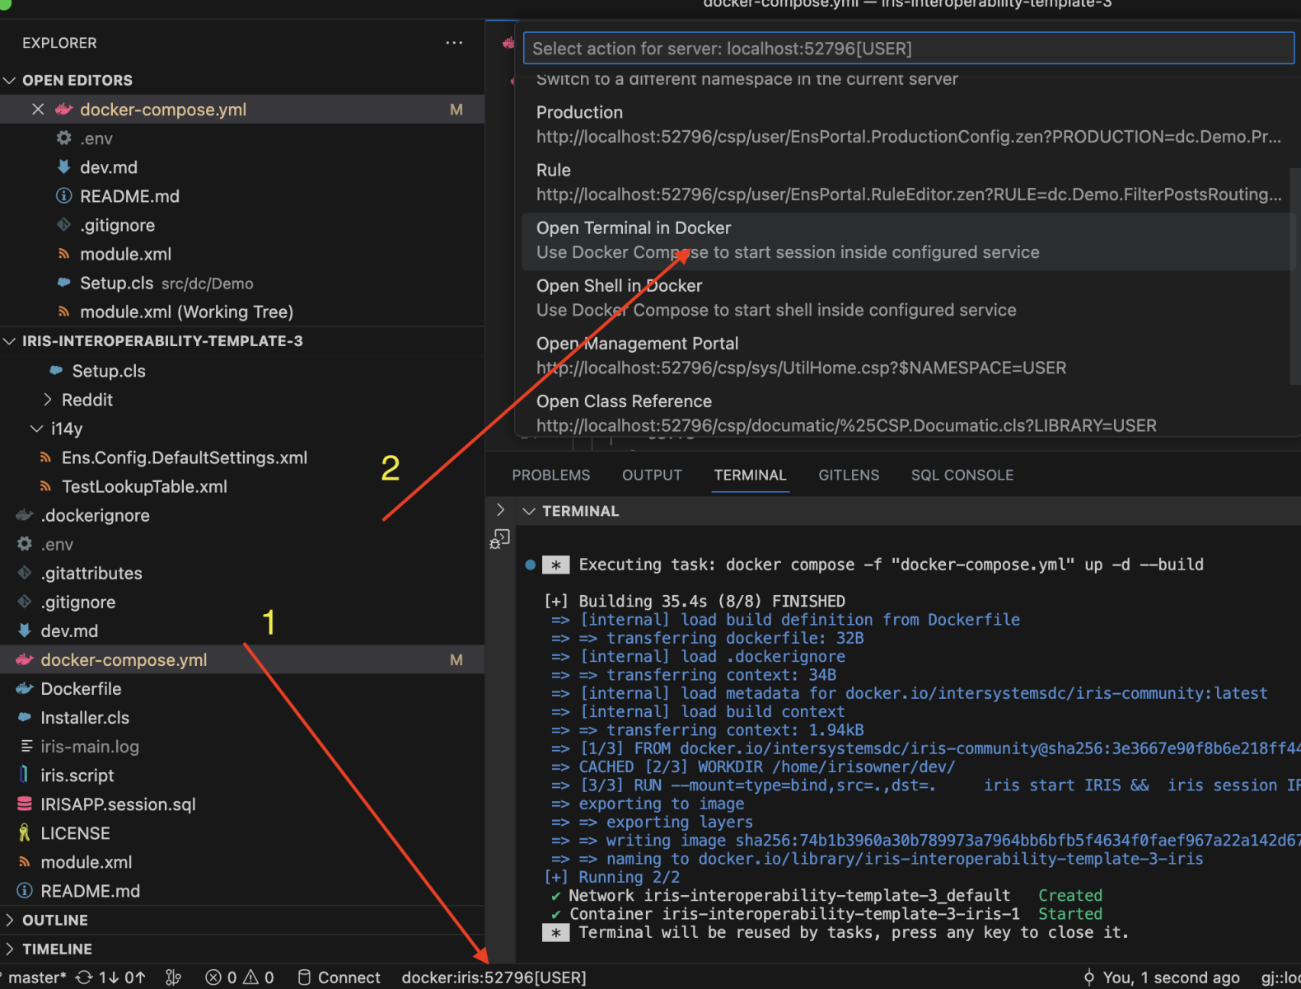
I would like to thank @Evgeny Shvarov for the picture and the explanation about this point.
For users with IRIS Versions Prior to 2023.2 working on their local machine
For users that work with a version of IRIS that runs on their local machine, it is possible to set up a dedicated IRIS terminal within VSC:
-
- Open the settings.json file. You can find it in several ways, for example by clicking on View > Command Palette > type: “settings” > Open User Settings (JSON)
- Add the following code under "terminal.integrated.profiles.windows":
"terminal.integrated.profiles.windows":{

    "IRIS Terminal": {

        "path": [

            "C:\\InterSystems\\IRISHealth\\bin\\irissession.exe"
        ],

        "args": ["IRISHEALTH"],

        "icon": "terminal-cmd"
    }

}
Note: Insert the right path of your irissession.exe.
c. To open the Terminal from VSC navigate to: Terminal > New Terminal > Launch Profile… > IRIS Terminal.
d. An 'IRIS Terminal' voice should now be available in the Terminal menu:

For Users Coding on IRIS based on a remote server using an SSH connection
For those who work on a version of IRIS based on a remote server (e.g., a company server) accessible via SSH connection (e.g., using PuTTY) it is possible to use the Remote - SSH VSC extension to connect VSC directly to the server. In order to do so:
-
- Install the Remote - SSH: Editing Configuration Files extension on VSC;
- Click on the “Remote Explorer” icon
 in the sidebar;
- Select “Open SSH Config File”

and open the configuration file with the path: C:\Users\<username>\.ssh\config
-
- Insert the following code into the configuration file:
Host my-putty-connection

    HostName < IP address or server name >

    User < username >

    IdentityFile < private key path on your local machine >

    Port < port >
The IP Address and Port correspond to the Host Name and Port specified in PuTTY, the Username is the user credential used to access the remote server and the IdentityFile is the file path to your PuTTY private key.
Note: The original format of the private key generated by PuTTY (.ppk) cannot be read by VSC. To establish a connection between VSC and the remote server via PuTTY, you must duplicate the original private key and convert the new version into the .pem format. In order to do the conversion:
- Launch PuTTYgen application
- Under File menu, click Load private key
- Select your private key in .ppk format, then choose Open
- Under the Conversions menu, click Export OpenSSH Key (force new file format).
- Set a new name with the .pem extension and click the Save button.
- Link the path of this new .pem file to the IdentifyFile parameter in VSC
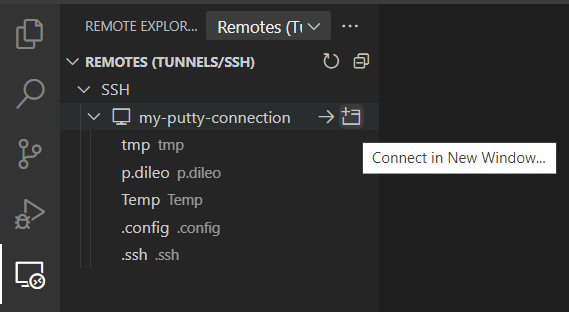
- Save the file. After a few seconds the new connection should appear in the Remote Explorer panel;
- Click "Connect in New Window..." to open the SSH connection in a new VSC window:
- Select the operating system of your remote machine (only at the first access)
- In the new window, navigate to: Terminal > New Terminal (or use the shortcuts Ctrl + ò or Ctrl + Shift + ò).
- You're now connected to the remote machine and can use its IRIS Terminal within VSC.
Note: This operation only works if you have initiated your remote connection via PuTTY previously and does not function when PuTTY is closed or when you are not connected to the remote server. This operation does not launch PuTTY, it only allows VSC to connect to the tunnel established by PuTTY.
To initiate a PuTTY connection through VSC, you can utilize a batch file (on Windows). The provided connect_remote.bat file employs the Plink command, which is included with PuTTY, to start a session:
@echo off

set SESSION="<your saved session name>"

plink -load %SESSION%
To start the session, simply type .\connect_remote.bat in VSC terminal to open the remote connection and insert your credentials.
Note: This latter method provide you the access to a Terminal version that supports all VSC shortcuts! Welcome back Ctrl+V, goodbye Shift+Insert 🎉
 Open Exchange
.png)
.png)
.jpg)