Hi Community,
In this article, I will demonstrate below steps to create your own chatbot by using spaCy (spaCy is an open-source software library for advanced natural language processing, written in the programming languages Python and Cython):
-
Step1: Install required libraries
-
Step2: Create patterns and responses file
-
Step3: Train the Model
-
Step4: Create ChatBot Application based on the trained model
So Let us start.
Step1: Install required libraries
First of all, we need to install the required python libraries, which we can achieve by running the below command:
pip3 install spacy nltk
pip3 install torch torchvision torchaudio --index-url https://download.pytorch.org/whl/cpu
Step2: Create patterns and responses file
We need to create intents.json file containing question patterns and responses, below is an example of some of the question patterns and responses
{
  "intents": [
    {
      "tag": "greeting",
      "patterns": [
        "Hi",
        "Hey",
        "How are you",
        "Is anyone there?",
        "Hello",
        "Good day"
      ],
      "responses": [
        "Hey :-)",
        "Hello, thanks for visiting",
        "Hi there, what can I do for you?",
        "Hi there, how can I help?"
      ]
    },
    {
      "tag": "goodbye",
      "patterns": ["Bye", "See you later", "Goodbye"],
      "responses": [
        "See you later, thanks for visiting",
        "Have a nice day",
        "Bye! Come back again soon."
      ]
    },
    {
      "tag": "thanks",
      "patterns": ["Thanks", "Thank you", "That's helpful", "Thank's a lot!"],
      "responses": ["Happy to help!", "Any time!", "My pleasure"]
    },
    {
      "tag": "items",
      "patterns": [
        "tell me about this app",
        "What kinds of technology used?",
        "What do you have?"
      ],
      "responses": [
        "Write something about the app."
      ]
    },
    {
      "tag": "funny",
      "patterns": [
        "Tell me a joke!",
        "Tell me something funny!",
        "Do you know a joke?"
      ],
      "responses": [
        "Why did the hipster burn his mouth? He drank the coffee before it was cool.",
        "What did the buffalo say when his son left for college? Bison."
      ]
    }
  ]
}
Step3: Train the Model
3.1- Create a NeuralNet model.py file which will be used to train the model
import torch.nn as nn
class NeuralNet(nn.Module):
def __init__(self, input_size, hidden_size, num_classes):
super(NeuralNet, self).__init__()
self.l1 = nn.Linear(input_size, hidden_size)
self.l2 = nn.Linear(hidden_size, hidden_size)
self.l3 = nn.Linear(hidden_size, num_classes)
self.relu = nn.ReLU()
def forward(self, x):
out = self.l1(x)
out = self.relu(out)
out = self.l2(out)
out = self.relu(out)
out = self.l3(out)
return out
3.2 - We need nltk_utils.py file which uses "nltk" python library (a platform used for building Python programs that work with human language data for applying in statistical natural language processing (NLP)).
import numpy as np
import nltk
from nltk.stem.porter import PorterStemmer
stemmer = PorterStemmer()
def tokenize(sentence):
"""
split sentence into array of words/tokens
a token can be a word or punctuation character, or number
"""
return nltk.word_tokenize(sentence)
def stem(word):
"""
stemming = find the root form of the word
examples:
words = ["organize", "organizes", "organizing"]
words = [stem(w) for w in words]
-> ["organ", "organ", "organ"]
"""
return stemmer.stem(word.lower())
def bag_of_words(tokenized_sentence, words):
"""
return bag of words array:
1 for each known word that exists in the sentence, 0 otherwise
example:
sentence = ["hello", "how", "are", "you"]
words = ["hi", "hello", "I", "you", "bye", "thank", "cool"]
bog = [ 0 , 1 , 0 , 1 , 0 , 0 , 0]
"""
sentence_words = [stem(word) for word in tokenized_sentence]
bag = np.zeros(len(words), dtype=np.float32)
for idx, w in enumerate(words):
if w in sentence_words:
bag[idx] = 1
return bag
3.3 - We need to train the model, We will use the train.py file to create our model
import numpy as np
import json,torch
import torch.nn as nn
from torch.utils.data import Dataset, DataLoader
from nltk_utils import bag_of_words, tokenize, stem
from model import NeuralNet
with open('intents.json', 'r') as f:
intents = json.load(f)
all_words = []
tags = []
xy = []
for intent in intents['intents']:
tag = intent['tag']
tags.append(tag)
for pattern in intent['patterns']:
w = tokenize(pattern)
all_words.extend(w)
xy.append((w, tag))
ignore_words = ['?', '.', '!']
all_words = [stem(w) for w in all_words if w not in ignore_words]
all_words = sorted(set(all_words))
tags = sorted(set(tags))
print(len(xy), "patterns")
print(len(tags), "tags:", tags)
print(len(all_words), "unique stemmed words:", all_words)
X_train = []
y_train = []
for (pattern_sentence, tag) in xy:
bag = bag_of_words(pattern_sentence, all_words)
X_train.append(bag)
label = tags.index(tag)
y_train.append(label)
X_train = np.array(X_train)
y_train = np.array(y_train)
num_epochs = 1000
batch_size = 8
learning_rate = 0.001
input_size = len(X_train[0])
hidden_size = 8
output_size = len(tags)
print(input_size, output_size)
class ChatDataset(Dataset):
def __init__(self):
self.n_samples = len(X_train)
self.x_data = X_train
self.y_data = y_train
def __getitem__(self, index):
return self.x_data[index], self.y_data[index]
def __len__(self):
return self.n_samples
dataset = ChatDataset()
train_loader = DataLoader(dataset=dataset,
batch_size=batch_size,
shuffle=True,
num_workers=0)
device = torch.device('cuda' if torch.cuda.is_available() else 'cpu')
model = NeuralNet(input_size, hidden_size, output_size).to(device)
criterion = nn.CrossEntropyLoss()
optimizer = torch.optim.Adam(model.parameters(), lr=learning_rate)
for epoch in range(num_epochs):
for (words, labels) in train_loader:
words = words.to(device)
labels = labels.to(dtype=torch.long).to(device)
outputs = model(words)
loss = criterion(outputs, labels)
optimizer.zero_grad()
loss.backward()
optimizer.step()
if (epoch+1) % 100 == 0:
print (f'Epoch [{epoch+1}/{num_epochs}], Loss: {loss.item():.4f}')
print(f'final loss: {loss.item():.4f}')
data = {
"model_state": model.state_dict(),
"input_size": input_size,
"hidden_size": hidden_size,
"output_size": output_size,
"all_words": all_words,
"tags": tags
}
FILE = "chatdata.pth"
torch.save(data, FILE)
print(f'training complete. file saved to {FILE}')
3.4 - Run the above train.py file to train the model
.png)
Train.py file will create chatdata.pth file which will be used in our chat.py file
Step4: Create ChatBot Application based on the trained model
As Our model is created. In the final step, we will create a chat.py file which we can use in our chatbot.
import os,random,json,torch
from model import NeuralNet
from nltk_utils import bag_of_words, tokenize
device = torch.device('cuda' if torch.cuda.is_available() else 'cpu')
with open("intents.json") as json_data:
intents = json.load(json_data)
data_dir = os.path.join(os.path.dirname(__file__))
FILE = os.path.join(data_dir, 'chatdata.pth')
data = torch.load(FILE)
input_size = data["input_size"]
hidden_size = data["hidden_size"]
output_size = data["output_size"]
all_words = data['all_words']
tags = data['tags']
model_state = data["model_state"]
model = NeuralNet(input_size, hidden_size, output_size).to(device)
model.load_state_dict(model_state)
model.eval()
bot_name = "iris-NLP"
def get_response(msg):
sentence = tokenize(msg)
X = bag_of_words(sentence, all_words)
X = X.reshape(1, X.shape[0])
X = torch.from_numpy(X).to(device)
output = model(X)
_, predicted = torch.max(output, dim=1)
tag = tags[predicted.item()]
probs = torch.softmax(output, dim=1)
prob = probs[0][predicted.item()]
if prob.item() > 0.75:
for intent in intents['intents']:
if tag == intent["tag"]:
return random.choice(intent['responses'])
return "I do not understand..."
if __name__ == "__main__":
print("Let's chat! (type 'quit' to exit)")
while True:
sentence = input("You: ")
if sentence == "quit":
break
resp = get_response(sentence)
print(resp)
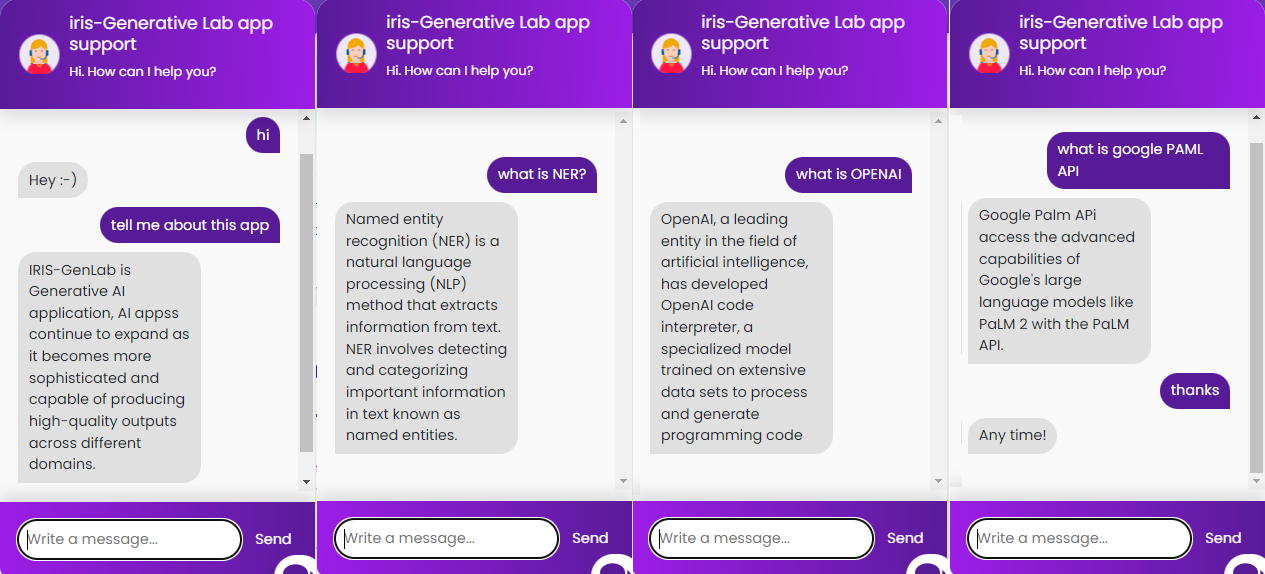
Run chat.py file and ask some questions which already defined above in our intents.json file
.png)
For more details please visit IRIS-GenLab open exchange application page
Thanks
.png)
 Open Exchange