Nueva publicación

Encontrar

Pregunta
· 1 mar, 2024

POST request with paging FHIR bundle

Hi everyone,

I'm looking for a strategy for dividing a large FHIR message, in a post request, into smaller parts. 

I have found the paging modifier for the GET request, but not a similiar one for the POST request. Maybe the 'batch' type of a Bundle could help me to indicate this aim but there aren't any attribute to say the total or the i-th element. 

Do you know of any method for implementing 'paging' in a post request?

2 comentarios
Comentarios (2)2
Inicie sesión o regístrese para continuar
Artículo
· 29 feb, 2024 Lectura de 5 min

インデックス再構築が終わるまで新しく定義したインデックスを使用させない方法

これは InterSystems FAQ サイトの記事です。

新しいインデックスを定義した後、インデックスの再構築が完了する前にクエリを実行するとデータが存在しているにもかかわらず「検索結果0件」や検索結果数が徐々に増えるような状況が発生します。

インデックスを永続クラス定義(またはテーブル定義)に追加しコンパイルすることで今まで使用していたクエリ実行経路が削除され、再度同じクエリを実行するタイミングで新しいインデックス定義を含めた実行経路が作成されるためです。(この時にインデックス再構築が完了していないとインデックスデータが存在しない、または不完全であるため0件や徐々に検索結果数が増えるような状況を起こします。)

これを起こさなために、新しいインデックスの再構築が終了するまでクエリオプティマイザにインデックスを使用させないように指定する方法が用意されています。

※ 2024/8/2: 2024.1以降から利用できる方法を追加しました。


2024.1以降

CREATE INDEXのDEFERオプションを使用します(オプションを付けないCREATE INDEX文では、作成時にインデックスの再構築も同時に行われます)。

DEFERオプションを使用することで、インデックスは追加されますがインデックスの再構築は行われず、追加したインデックスはクエリオプティマイザが使用しないように「選択不可」に設定されます。

再構築が行えるタイミングで BUILD INDEX文を利用することで、再構築が終了すると同時に追加したインデックスが「選択可能」に自動的に設定されます。

なお、追加したインデックスの選択可/不可は管理ポータルのSQL画面で確認できます(管理ポータル > [SQL] > ネームスペース選択 > テーブル選択 > (画面右)カタログの詳細 > [マップ/インデックス]をチェック)。

※インデックスの「選択可能」「選択不可」は、以降でご紹介するSetMapSelectability()メソッドを利用しても変更できます。

※永続クラス定義を利用している場合、デフォルトではDDLの発行が無効化されています。クラス定義文に DdlAllowed属性 を追加することでDDL文の発行ができます(設定後、クラス定義をコンパイルする必要があります)。


以下定義を行った場合は、管理ポータルでは図のように見えます。

CREATE INDEX NameIdx On Sample.Person (Name) DEFER
CREATE INDEX PrefIdx On Sample.Person (Pref)


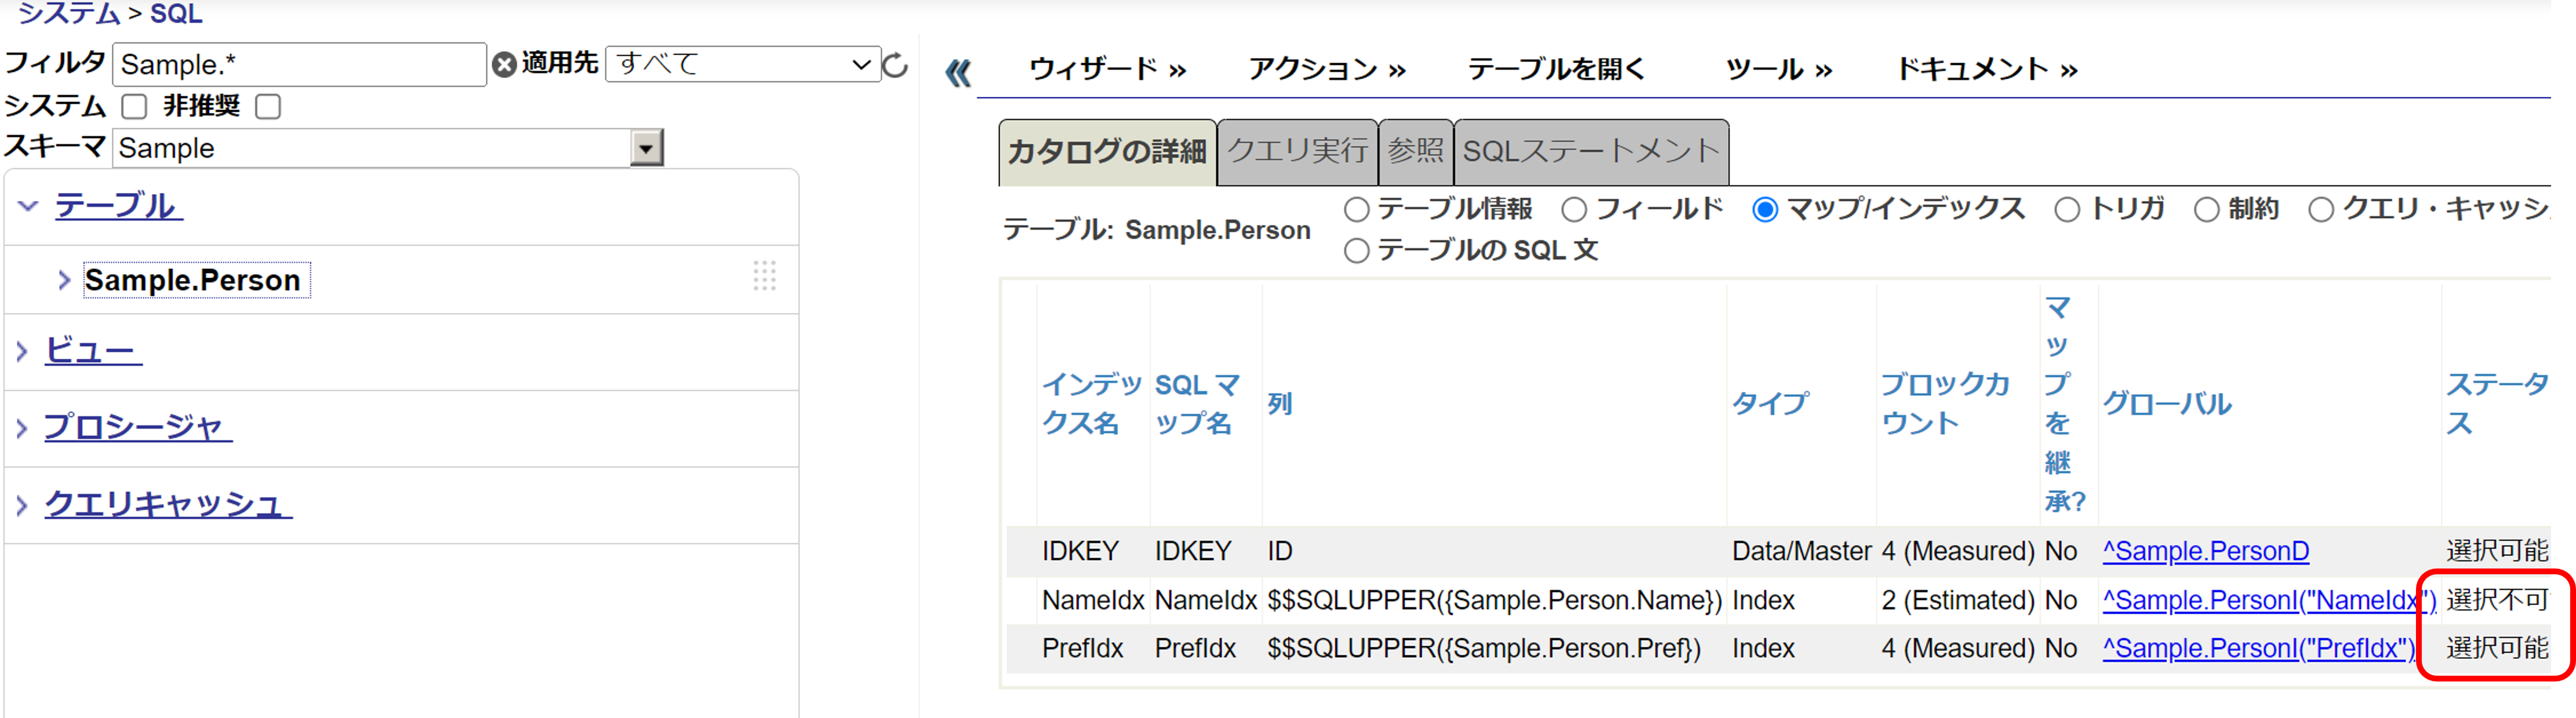
インデックス追加から再構築までの手順は以下の通りです。

1) 永続クラス定義の場合、DdlAllowed属性を設定します。

Class Sample.Person Extends %Persistent [ DdlAllowed ]


2) CREATE INDEXのDEFERオプションを付けてインデックス定義を追加します。

CREATE INDEX NameIdx On Sample.Person (Name) DEFER


3) 再構築ができるタイミングで、BUILD INDEXを実行します。

BUILD INDEX FOR TABLE Sample.Person INDEX NameIdx


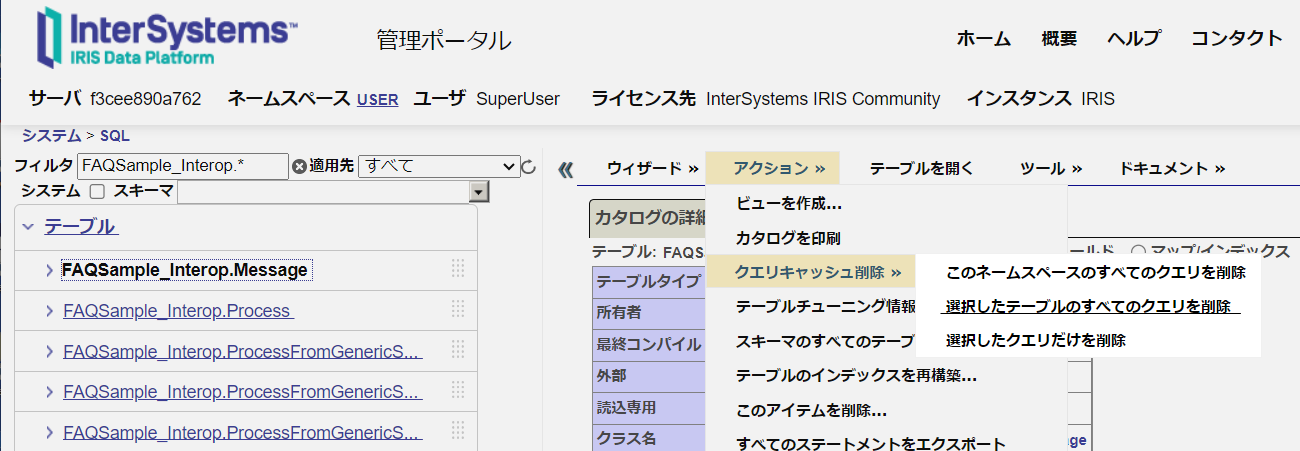
4) BUILD INDEXが終了したら、追加したインデックスで影響を受けそうなクエリキャッシュを破棄します。

管理ポータルでクエリキャッシュを削除するには、管理ポータル > [システムエクスプローラ] > [SQL] > (対象ネームスペースに切り替えた後) > [アクション] > [クエリキャッシュ削除]

プログラムからキャッシュを破棄する場合は、「プログラムでクエリキャッシュを削除する方法」をご参照ください。


2023.1以前

2022.1以降では、$SYSTEM.SQL.Util.SetMapSelectability()を使用します。

※インデックスの再構築が完了したら、必ず指定を元に戻してください。

(2021.1以前では、$SYSTEM.SQL.SetMapSelectability()を使用します。引数の指定方法は2022.1以降と同様です。)


SetMapSelectability()メソッドは%Statusの戻り値が設定されています。
ステータスOKの場合は1が戻ります。エラーステータスの場合は以下のメソッドを使用してエラー内容を確認してください。

write $SYSTEM.Status.GetErrorText(ステータスが入った変数)

ご参考:%Statusのエラーが返ってきたら


以下、Training.Employeeに新インデックス:NewIndexを定義する例でご紹介します。

1) 定義予定の新インデックス名をクエリオプティマイザが使用しないように設定します。

set status=$SYSTEM.SQL.Util.SetMapSelectability("Training.Employee","NewIndex",0)
  • 第1引数:クラス名
  • 第2引数:インデックス名(これから指定する新インデックス名を指定します。)
  • 第3引数:隠す場合は0、見せる場合は1

2) インデックスを追加します。

  • 永続クラスの場合はインデックスを追加しコンパイルし、インデックス再構築を実行します。
  • SQL文で実行する場合はCREATE INDEXを実行した後インデックス再構築が自動的に開始されます。

3) クエリオプティマイザにインデックスを見せるように変更します。

 ※インデックスの再構築が終了してから行います。

$system.SQL.Util.SetMapSelectability("Training.Employee","NewIndex",1)

4) クエリキャッシュを削除します。

方法詳細は、2024.1以降の手順でご紹介した図解をご参照ください。


関連項目として、インデックスの再構築を複数のプロセスで行う方法もあります。
詳細は:「アプリケーション使用中にインデックス再構築を複数プロセスで実行する方法」をご覧ください。 

《注意》CREATE INDEX文でインデックスを追加した場合、インデックス追加後すぐに再構築が開始されますが、インデックスをクラス定義文で追加した場合インデックス再構築は実行を命令するまで開始されません。

1 Comentario
Comentarios (1)1
Inicie sesión o regístrese para continuar
Anuncio
· 29 feb, 2024

Reminder: Exam Design Feedback for InterSystems IRIS Developer Professional Exam Closes March 8

Hi All,

On February 8, 2024, we asked for input from the IRIS community regarding exam topics for our InterSystems IRIS Developer Professional exam. We will close the window for providing feedback on the exam topics on Friday, March 8, 2024. If you would like to have your say in what topics are covered on the exam, this is your last chance!

How can I access the survey? You can access it here

  • Survey does not work well on mobile devices - you can access it, but it will involve a lot of scrolling
  • Survey can be resumable if you return to it on the same device in the same browser - answers save with the Save/Next button
  • Survey will close on March 8, 2024

InterSystems IRIS Developer Professional

back-end software developer who:

  • writes and executes efficient, scalable, maintainable, and secure code on (or adjacent to) InterSystems IRIS using best practices for the development lifecycle,
  • effectively communicates development needs to systems and operations teams (e.g., database architecture strategy),
  • integrates InterSystems IRIS with modern development practices and patterns, and
  • is familiar with the different data models and modes of access for InterSystems IRIS (ObjectScript, Python, SQL, JDBC/ODBC, REST, language gateways, etc.).

At least 2 years of experience developing with InterSystems IRIS is recommended. Any code samples that include InterSystems IRIS classes will have methods displayed in both ObjectScript and Python (or SQL). 

Comentarios (0)1
Inicie sesión o regístrese para continuar
Artículo
· 29 feb, 2024 Lectura de 4 min

Testing Columnar Storage

As most of you probably already know, since approximately the end of 2022 InterSystems IRIS included the columnar storage functionality to its database, well, in today's article we are going to put it to the test in comparison to the usual row storage.

Columnar Storage

What is the main characteristic of this type of storage? Well, if we consult the official documentation we will see this fantastic table that explains the main characteristics of both types of storage (by rows or by columns):

As you can see, columnar storage is designed primarily for analytical tasks in which queries are launched against specific fields in our table, while row storage is more optimal when a large number of insertion, update and deletion operations are required. as well as obtaining complete records.

If you continue reading the documentation you will see how simple it is to configure our table to be able to use columnar storage:

CREATE TABLE table (column type, column2 type2, column3 type3) WITH STORAGETYPE = COLUMNAR

Using this command we would be defining all the columns of our table with columnar storage, but we could opt for a mixed model in which our table has row storage but certain columns make use of columnar storage.

This mixed scenario could be interesting in cases where aggregation operations such as sums, averages, etc. are common. For this case we could define which column is the one that will use said storage:

CREATE TABLE table (column type, column2 type2, column3 type3 WITH STORAGETYPE = COLUMNAR)

In the previous example we defined a table with row storage and a column (column3) with columnar storage.

Comparative

To compare the time spent by column storage and row storage in different queries, we have created a small exercise using Jupyter Notebook that will insert a series of records that we will generate in two tables, the first with storage with rows ( Test.PurchaseOrderRow) and the second with columnar storage in two of its columns (Test.PurchaseOrderColumnar)

Test.PurchaseOrderRow

CREATE TABLE Test.PurchaseOrderRow (
    Reference INTEGER,
    Customer VARCHAR(225),
    PaymentDate DATE,
    Vat NUMERIC(10,2),
    Amount NUMERIC(10,2),
    Status VARCHAR(10))

Test.PurchaseOrderColumnar

CREATE TABLE Test.PurchaseOrderColumnar (
    Reference INTEGER,
    Customer VARCHAR(225),
    PaymentDate DATE,
    Vat NUMERIC(10,2),
    Amount NUMERIC(10,2) WITH STORAGETYPE = COLUMNAR,
    Status VARCHAR(10) WITH STORAGETYPE = COLUMNAR)

If you download the Open Exchange project and deploy it in your local Docker, you can access the Jupyter Notebook instance and review the file PerformanceTests.ipynb, which will be responsible for generating the random data that we are going to store in different phases in our tables and finally it will show us a graph with the performance of the query operations.

Let's take a quick look at our project configuration:

docker-compose.yml

version: '3.7'
services:
  # iris
  iris:
    init: true
    container_name: iris
    build:
      context: .
      dockerfile: iris/Dockerfile
    ports:
      - 52774:52773
      - 51774:1972
    volumes:
    - ./shared:/shared
    environment:
    - ISC_DATA_DIRECTORY=/shared/durable
    command: --check-caps false --ISCAgent false
  # jupyter notebook
  jupyter:
    build:
      context: .
      dockerfile: jupyter/Dockerfile
    container_name: jupyter
    ports:
      - "8888:8888"
    environment:
      - JUPYTER_ENABLE_LAB=yes
      - JUPYTER_ALLOW_INSECURE_WRITES=true
    volumes:
      - ./jupyter:/home/jovyan
      - ./data:/app/data
    command: "start-notebook.sh --NotebookApp.token='' --NotebookApp.password=''" 

We deploy the IRIS and Jupyter containers in our docker, initially configuring IRIS with the namespace "TEST" and the two tables required for the test.

To avoid boring you with code, you can consult the PerformanceTests.ipynb file from which we will connect to IRIS, generate the records to be inserted and store them in IRIS

Test execution

The results have been the following (in seconds):

Inserts:

The insertions made are of bulk type:

INSERT INTO Test.PurchaseOrderColumnar (Reference, Customer, PaymentDate, Vat, Amount, Status) VALUES (?, ?, ?, ?, ?, ?)

And the time for each batch of inserts is as follows:

Total inserts

Row storage Mixed storage
1000

0.031733

0.041677

5000

0.159338

0.185252

20000

0.565775

0.642662

50000

1.486459

1.747124

100000

2.735016

3.265492

200000

5.395032

6.382278

Selects:

The Select launched includes an aggregation function and a condition, both on columns with columnar storage:

SELECT AVG(Amount) FROM Test.PurchaseOrderColumnar WHERE Status = 'SENT'

Total rows

Row storage Mixed storage
1000

0.002039

0.001178

5000

0.00328

0.000647

20000

0.005493

0.001555

50000

0.016616

0.000987

100000

0.036112

0.001605

200000

0.070909

0.002738

Conclusions

As you can see in the results obtained, the operation is exactly what is indicated in the documentation. Including columns with columnar storage has slightly penalized performance during insert (about 18% slower for our example) while queries on those same columns have dramatically improved response time (258 times faster).

It is undoubtedly something to take into account when planning the development of any application.

4 comentarios
Comentarios (4)1
Inicie sesión o regístrese para continuar
Artículo
· 29 feb, 2024 Lectura de 5 min

Poniendo a prueba el Columnar Storage

Como seguramente ya sabréis la mayoría de vosotros, desde aproximadamente finales de 2022 InterSystems IRIS incluyo la funcionalidad de almacenamiento columnar a su base de datos, pues bien, en el artículo de hoy vamos a ponerla a prueba en comparación con el almacenamiento en filas habitual.

Almacenamiento columnar

¿Cuál es la principal característica de este tipo de almacenamiento? Pues bien, si consultamos la documentación oficial veremos esta fantástica tabla que nos explica las principales características de ambos tipos de almacenamiento (por filas o por columnas):

Como véis el almacenamiento columnar está pensado sobretodo para tareas de tipo analítico en las que se lanzan consultas contra campos específicos de nuestra tabla, mientras que el almacenamiento por filas es más óptimo cuando se requiere realizar gran número de operaciones de inserción, actualización y eliminación, así como obtener registros íntegros.

Si seguís leyendo la documentación veréis lo sencillo que es configurar nuestra tabla para poder utilizar el almacenamiento columnar:

CREATE TABLE table (column type, column2 type2, column3 type3) WITH STORAGETYPE = COLUMNAR

Mediante este comando estaríamos definiendo todas las columnas de nuestra tabla con almacenamiento columnar, pero podríamos decantarnos por un modelo mixto en el que nuestra tabla tenga un almacenamiento en filas pero que determinadas columnas hagan uso del almacenamiento columnar.

Este escenario mixto podría ser interesante en casos en los que sean habitual operaciones de agregación como sumas, medias, etc. Para este caso podríamos definir que columna es la que hará uso de dicho almacenamiento:

CREATE TABLE table (column type, column2 type2, column3 type3 WITH STORAGETYPE = COLUMNAR)

En el ejemplo anterior definiríamos una tabla con almacenamiento por filas y una columna (column3) con almacenamiento columnar.

Comparativa

Para realizar la comparativa entre el tiempo empleado por almacenamiento columnar y el de por filas en diferentes consultas hemos creado un pequeño ejercicio haciendo uso de Jupyter Notebook que va a insertar una serie de registros que generaremos en dos tablas, la primera con almacenamiento con filas (Test.PurchaseOrderRow) y la segunda con almacenamiento columnar en dos de sus columnas (Test.PurchaseOrderColumnar)

Test.PurchaseOrderRow

CREATE TABLE Test.PurchaseOrderRow (
    Reference INTEGER,
    Customer VARCHAR(225),
    PaymentDate DATE,
    Vat NUMERIC(10,2),
    Amount NUMERIC(10,2),
    Status VARCHAR(10))

Test.PurchaseOrderColumnar

CREATE TABLE Test.PurchaseOrderColumnar (
    Reference INTEGER,
    Customer VARCHAR(225),
    PaymentDate DATE,
    Vat NUMERIC(10,2),
    Amount NUMERIC(10,2) WITH STORAGETYPE = COLUMNAR,
    Status VARCHAR(10) WITH STORAGETYPE = COLUMNAR)

Si os descargais el proyecto de Open Exchange y lo desplegáis en vuestro Docker local podréis acceder a la instancia de Jupyter Notebook y revisar el archivo PerformanceTests.ipynb el cual será el encargado de generar los datos aleatorios que vamos a almacenar en diferentes fases en nuestras tablas y finalmente nos mostrará una gráfica con el rendimiendo de las operaciones de consulta.

Echemos un vistazo rápido a la configuración de nuestro proyecto:

docker-compose.yml

version: '3.7'
services:
  # iris
  iris:
    init: true
    container_name: iris
    build:
      context: .
      dockerfile: iris/Dockerfile
    ports:
      - 52774:52773
      - 51774:1972
    volumes:
    - ./shared:/shared
    environment:
    - ISC_DATA_DIRECTORY=/shared/durable
    command: --check-caps false --ISCAgent false
  # jupyter notebook
  jupyter:
    build:
      context: .
      dockerfile: jupyter/Dockerfile
    container_name: jupyter
    ports:
      - "8888:8888"
    environment:
      - JUPYTER_ENABLE_LAB=yes
      - JUPYTER_ALLOW_INSECURE_WRITES=true
    volumes:
      - ./jupyter:/home/jovyan
      - ./data:/app/data
    command: "start-notebook.sh --NotebookApp.token='' --NotebookApp.password=''" 

Desplegamos en nuestro docker los contenedores de IRIS y Jupyter, configurando al inicio IRIS con el namespace "TEST" y las dos tablas requeridas para la prueba.

Para no aburriros con código podéis consultar vosotros mismos el archivo PerformanceTests.ipynb desde el que nos conectaremos a IRIS, generaremos los registros a insertar y los almacenaremos en IRIS

Ejecución de las pruebas

Los resultados han sido los siguientes (en segundos):

Inserciones:

Las inserciones realizadas son de tipo bulk:

INSERT INTO Test.PurchaseOrderColumnar (Reference, Customer, PaymentDate, Vat, Amount, Status) VALUES (?, ?, ?, ?, ?, ?)

Y el tiempo para cada lote de inserciones es el siguiente:

Total de inserciones

Almacenamiento por filas Almacenamiento mixto
1000

0.031733

0.041677

5000

0.159338

0.185252

20000

0.565775

0.642662

50000

1.486459

1.747124

100000

2.735016

3.265492

200000

5.395032

6.382278

Consultas:

La consulta lanzada incluye una función de agregación y una condición, ambas sobre las columnas con almacenamiento columnar: 

SELECT AVG(Amount) FROM Test.PurchaseOrderColumnar WHERE Status = 'SENT'

Total de filas

Almacenamiento por filas Almacenamiento mixto
1000

0.002039

0.001178

5000

0.00328

0.000647

20000

0.005493

0.001555

50000

0.016616

0.000987

100000

0.036112

0.001605

200000

0.070909

0.002738

Conclusiones

Como veis en los resultados obtenidos, el funcionamiento es exactamente a lo que se indica en la documentación. La inclusión de columnas con almacenamiento columnar ha penalizado levemente el rendimiento durante la inserción (un 18% más lento aproximadamente para nuestro ejemplo) mientras que las consultas sobre esas mismas columnas han mejorado espectacularmente el tiempo de respuesta (258 veces más rápida).

Sin duda es algo a tener en cuenta en el momento de planificar el desarrollo de cualquier aplicación.

2 comentarios
Comentarios (2)1
Inicie sesión o regístrese para continuar