
 Open Exchange
Como parte do concurso IRIS Python 2024, meu colega Damir e eu tivemos uma ideia de onstruir uma plataforma chamada ShelterShare para conectar vítimas e voluntários para requisições de abrigo. Para isso, escolhemos Django como uma framework e procedemos para construir a primeira versão ccom 3 docker containers diferentes, django, iris e nginx, que iriam então utilizar o IRIS puramente como uma máquina de base de dados pelo muito bem composto django_iris (cumprimentos ao Dimitry). Como progredimos rápido, decidimos explorar a opção de rodar ele dentro do mesmo container que o IRIS utilizando o WSGI adicionado em 2024.1. Nós sabíamos em avanço que não poderíamos depender totalmente do WSGI, já que estávamos utilizando WebSockets para atualizações instantâneas e comunicação na ferramenta, mas descobrimos que podemos sempre rodar uvicorn no container em paralelo ao iris e juntar o websocket nele numa porta diferente.
Então, é aí que começamos a ter problemas...
Nosso primeiro problema foi que estávamos usando uma versão antiga de django-iris que estava dependendo de um pacote chamado iris que estava conflitando com o iris.py embutido (i.e. parte do IRIS WSGI). Percebemos que o problema foi resolvido num pacote posterior de django-iris ao renomear iris para intersystems_iris, então atualizamos o django-iris, resolvemos o problema e seguimos em frente.
Nosso segundo problema apareceu quando tentamos utilizar ipm para instalar o pacote do módulo. Por qualquer razão ele falhava em migrar com erros estranhos de ConnectionReset...
sheltershare    | Waited 3 seconds for InterSystems IRIS to reach state 'running'
sheltershare    |
sheltershare    | Load started on 07/26/2024 14:39:06
sheltershare    | Loading file /usr/irissys/csp/sheltershare/module.xml as xml
sheltershare    | Imported document: sheltershare.ZPM
sheltershare    | Load finished successfully.
sheltershare    |
sheltershare    | Skipping preload - directory does not exist.
sheltershare    | Load started on 07/26/2024 14:39:07
sheltershare    | Loading file /usr/irissys/csp/sheltershare/module.xml as xml
sheltershare    | Imported document: sheltershare.ZPM
sheltershare    | Load finished successfully.
sheltershare    |
sheltershare    | Loading sheltershare in process 716
sheltershare    | [%SYS|sheltershare]	Reload START (/usr/irissys/csp/sheltershare/)
sheltershare    | [%SYS|sheltershare]	requirements.txt START
sheltershare    | Collecting Django==5.0.7
sheltershare    |   Using cached Django-5.0.7-py3-none-any.whl (8.2 MB)
sheltershare    | Collecting uvicorn[standard]
sheltershare    |   Using cached uvicorn-0.30.3-py3-none-any.whl (62 kB)
sheltershare    | Collecting channels
sheltershare    |   Using cached channels-4.1.0-py3-none-any.whl (30 kB)
sheltershare    | Collecting Faker
sheltershare    |   Using cached Faker-26.0.0-py3-none-any.whl (1.8 MB)
sheltershare    | Collecting django-iris
sheltershare    |   Using cached django_iris-0.2.4-py3-none-any.whl (134 kB)
sheltershare    | Collecting tzdata
####LOG TRIMMED FOR BREVITY####
sheltershare    | [%SYS|sheltershare]	requirements.txt SUCCESS
sheltershare    | Skipping preload - directory does not exist.
sheltershare    | [%SYS|sheltershare]	Reload SUCCESS
sheltershare    | [sheltershare]	Module object refreshed.
sheltershare    | [%SYS|sheltershare]	Validate START
sheltershare    | [%SYS|sheltershare]	Validate SUCCESS
sheltershare    | [%SYS|sheltershare]	Compile START
sheltershare    | [%SYS|sheltershare]	Compile SUCCESS
sheltershare    | [%SYS|sheltershare]	Activate START
sheltershare    | [%SYS|sheltershare]	Configure START
sheltershare    | [%SYS|sheltershare]	Configure SUCCESS
sheltershare    | Studio project created/updated: sheltershare.PRJ
sheltershare    | [%SYS|sheltershare]	Activate SUCCESS
sheltershare    | ShelterShare installed successfully!
sheltershare    |
sheltershare    | 126 static files copied to '/usr/irissys/csp/sheltershare/static', 3 unmodified.
sheltershare    | /usr/irissys/mgr/python/django/core/management/commands/makemigrations.py:160: RuntimeWarning: Got an error checking a consistent migration history performed for database connection 'default': [Errno 104] Connection reset by peer
sheltershare    |   warnings.warn(
sheltershare    | No changes detected
sheltershare    | Traceback (most recent call last):
sheltershare    |   File "/usr/irissys/mgr/python/intersystems_iris/dbapi/_DBAPI.py", line 47, in connect
sheltershare    |     return native_connect(
sheltershare    |   File "/usr/irissys/mgr/python/intersystems_iris/_IRISNative.py", line 183, in connect
sheltershare    |     connection._connect(hostname, port, namespace, username, password, timeout, sharedmemory, logfile, sslcontext, autoCommit, isolationLevel, featureOptions, application_name)
sheltershare    |   File "/usr/irissys/mgr/python/intersystems_iris/_IRISConnection.py", line 304, in _connect
sheltershare    |     raise e
sheltershare    |   File "/usr/irissys/mgr/python/intersystems_iris/_IRISConnection.py", line 212, in _connect
sheltershare    |     self._in_message._read_message_sql(sequence_number)
sheltershare    |   File "/usr/irissys/mgr/python/intersystems_iris/_InStream.py", line 46, in _read_message_sql
sheltershare    |     is_for_gateway = self.__read_message_internal(expected_message_id, expected_statement_id, type)
sheltershare    |   File "/usr/irissys/mgr/python/intersystems_iris/_InStream.py", line 59, in __read_message_internal
sheltershare    |     self.__read_buffer(header.buffer, 0, _MessageHeader.HEADER_SIZE)
sheltershare    |   File "/usr/irissys/mgr/python/intersystems_iris/_InStream.py", line 138, in __read_buffer
sheltershare    |     data = self._device.recv(length)
sheltershare    |   File "/usr/irissys/mgr/python/intersystems_iris/_Device.py", line 40, in recv
sheltershare    |     return self._socket.recv(len)
sheltershare    | ConnectionResetError: [Errno 104] Connection reset by peer
os quais não conseguimos resolver, então voltamos a usar Dockerfile, entrypoint.sh e docker-compose para definir totalmente o django app na pasta /usr/irisys/csp, então usamos o ipm apenas para carregar nosso app.xml nas Security.Applications.
import iris
iris.system.Process.SetNamespace("%SYS")
imported_status=iris.cls("Security.Applications").Import("/usr/irissys/csp/sheltershare/app.xml", num_imported,0)
Isso funcionou bem e é um jeito confiável de fazer o deploy. Você pode ver um exemplo de definições aqui: ShelterShare-SingleDocker
Note porém que sem o merge.cpf, o script irissetup.py vai falhar em rodar o iris por causa de problemas de Autorização... i.e.
RUN \
  cd /usr/irissys/csp/sheltershare && \
  iris start IRIS && \
  iris merge IRIS merge.cpf
Agora chegamos num grande problema. Bom, grande para nós porque foi muito difícil entender o que estava acontecendo, mas no final foi bem fácil de contornar...
Veja, estávamos confiando na autenticação do django para lidar com nossas contas de usuários, grupos, etc. que utilizamos simplesmente ao fazer:
user_obj = authenticate(username=request.POST['username'],
                        password=request.POST['password'])
if user_obj:
    login(request, user_obj)
    return redirect("index")
Que funciona bem com gunicorn, uvicorn e até em simplesmente manage.py runserver... mas no IRIS ele falhou silenciosamente e jogava de volta à tela de login.
Após muito procurar, debugar o console browser e inspecionar, verificamos que em circunstâncias normais, o servidor WSGI/ASGI em questão (exemplo uvicorn, gunicorn) vai fazer o login com sucesso retornar 2 parâmetros de cookie nas headers, um com um token CSRF e algumas outras informações, enquanto o outro contém o id de sessão.
O id de sessão então é salvo ao armazenamento do browser e é utilizado sempre que acessa uma página no mesmo domínio.
No entanto, parece que o IRIS WSGI, por qualquer razão, combina as duas headers de Set-Cookie em uma só. Veja a diferença abaixo:
UVICORN:

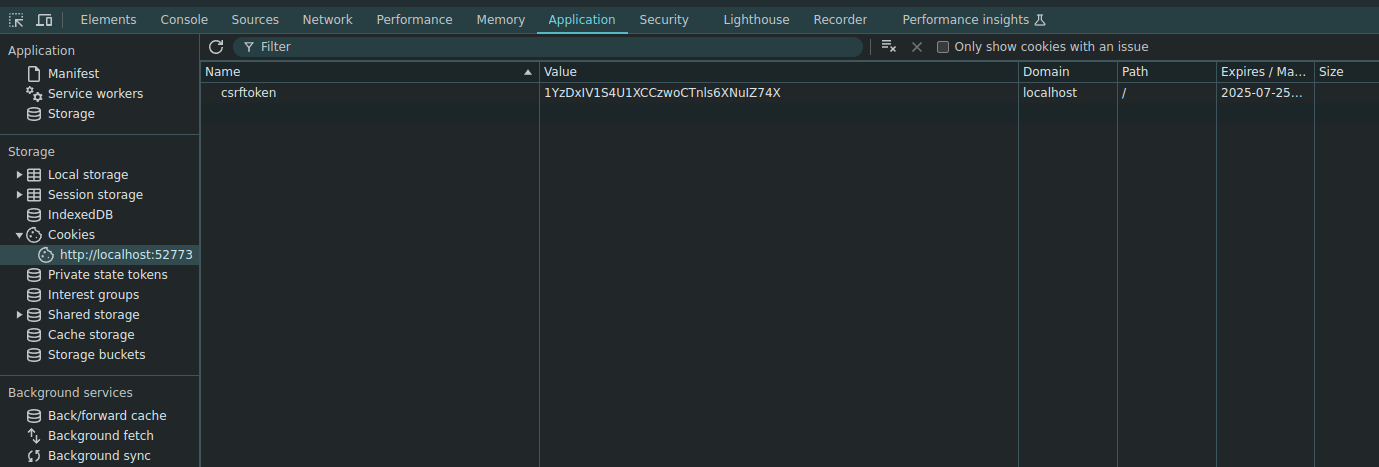
IRIS WSGI: e o armazenamento de Cookie associado:
 Então começamos a entender como contornar esse problema já que o Browser estava obviamente ignorando o sessionid da header Set-Cookie, então tentamos o seguinte:
WORKAROUND:
user_obj = authenticate(username=request.POST['username'],
                        password=request.POST['password'])
if user_obj:
    login(request, user_obj)
    response = redirect("index")
    # Add your custom header
    # Extract the sessionid from the Set-Cookie header
    sessionid = request.session.session_key

    if sessionid:
        # Add the sessionid as a separate Set-Cookie header
        response.set_cookie('sessionid', sessionid, httponly=True)

    return response
e agora a sessionid e CSRF estavam ainda na mesma header Set-Cookie, mas o id de sessão estava bem no começo do Set-Cookie, então o browser conseguiu obtê-lo sem problemas
APÓS O WORKAROUND IRIS WSGI:

e o resultado no armazenamento de cookie do browser:

Então, com esse contorno do problema, a autenticação do django começou a funcionar adequadamente e pudemos usar a aplicação para a maioria dos conteúdos síncronos. No entanto, encontramos outro problema de POSTs não funcionando corretamente, possivelmente porque o token CSRF estava agora no final do Set-Cookie (ou alguma outra razão) e ainda não tivemos tempo para procurar mais contornos do problema. No fim, com problemas de POSTs e nossa necessidade de ASGI, voltamos aos iniciais três containers docker e planejamos investigar WSGI (e quem sabe ASGI) um pouco mais no futuro...
