Nueva publicación

查找

Artículo
· 26 ene, 2024 Lectura de 8 min

PrivateGPT exploring the Documentation

Considering new business interest in applying Generative-AI to local commercially sensitive private data and information, without exposure to public clouds. Like a match needs the energy of striking to ignite, the Tech lead new "activation energy" challenge is to reveal how investing in GPU hardware could support novel competitive capabilities. The capability can reveal the use-cases that provide new value and savings.

Sharpening this axe begins with a functional protocol for running LLMs on a local laptop.

My local Mac has an M1 processor. In early experiments had found from exploring Falcon models the flow of toolkit was primarily towards using the Cuda graphics card. There are "compressed" versions of models ( Quantized ). However from my current exploration path these could only be loaded into a Cuda GPU which I didn't have. No Bit-and-bytes support for M1 / M2 processors and AutoGPTQ quantization didn't support MPS processor either. Running the unquantized models in CPU was prohibitively slow.

I had spotted PrivateGPT project and the following steps got things running.

# install developer tools
xcode-select --install 

# create python sandbox
mkdir PrivateGTP
cd privateGTP/
python3 -m venv .
# actiavte local context
source bin/activate

# privateGTP uses poetry for python module management
privateGTP> pip install poetry

# sync privateGTP project
privateGTP> git clone https://github.com/imartinez/privateGPT

# enable MPS for model loading and processing
privateGTP> CMAKE_ARGS="-DLLAMA_METAL=on" pip install --force-reinstall --no-cache-dir llama-cpp-python

privateGTP> cd privateGPT

# Import configure python dependencies
privateGTP> poetry run python3 scripts/setup

# launch web interface to confirm operational on default model
privateGTP> python3 -m private_gpt
# navigate safari browser to http://localhost:8001/

# To bulk import documentation needed to stop the web interface as vector database not in multi-user mode
privateGTP> [control] + "C"

# import some PDFs
privateGTP> curl "https://docs.intersystems.com/irislatest/csp/docbook/pdfs.zip" -o /tmp/pdfs.zip
privateGTP> unzip /tmp/pdfs.zip -d /tmp
# took a few hours to process
privateGTP> make ingest /tmp/pdfs/pdfs/

# launch web interface again for query documentation
privateGTP> python3 -m private_gpt

Experiments with the default model mistral-7B-Instruct

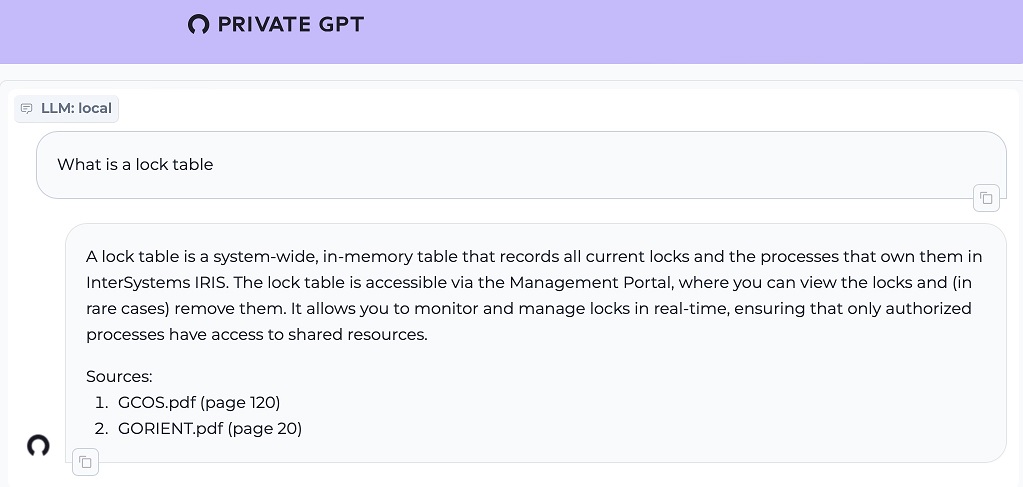
Some things that worked reasonably were looking for more textual content.

1. What is a lock Table?

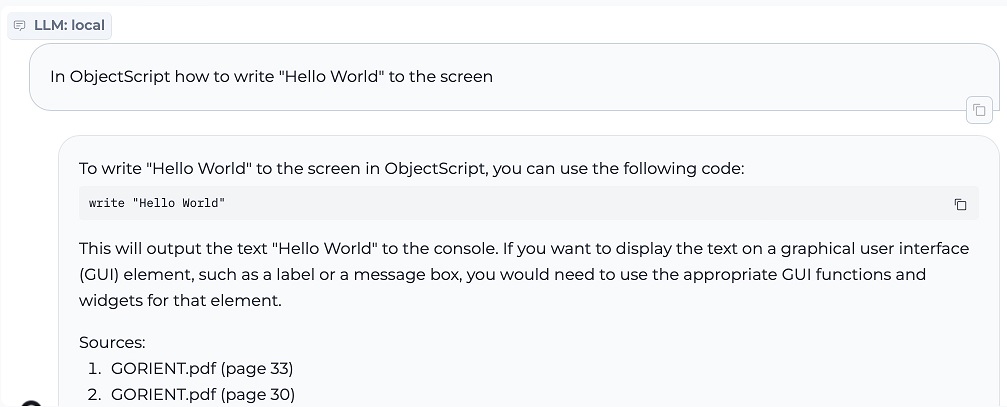
2. Write Object Script "Hello World"

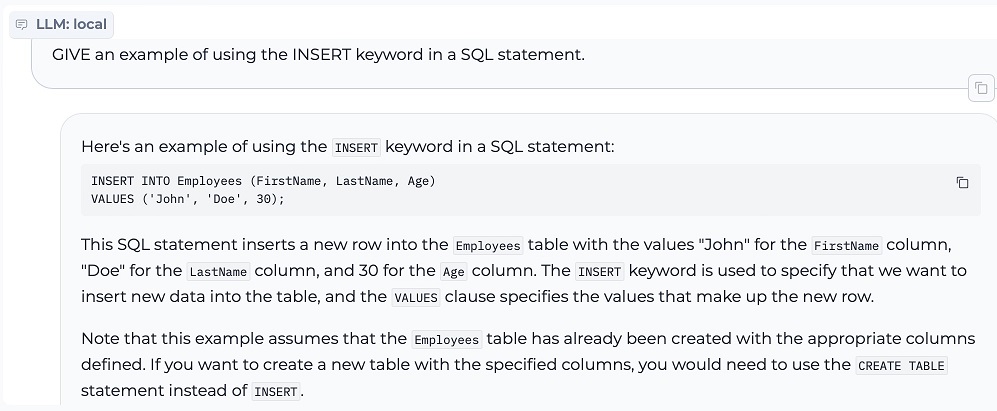
3. INSERT in SQL Statement

The trailing semicolon is a trained habit from training on different implementations of SQL.

Current deployed versions of IRIS would have an issue with the trailing semicolon but this is addressed as discarded rather that being an error in newer version specifically to address this common generative nuance.

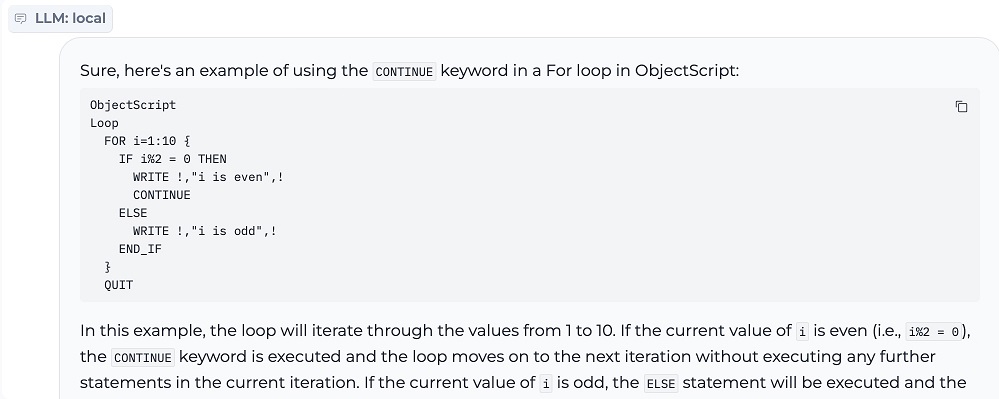
4. ObjectScript FOR loop

The challenge here is treating the increment as the max counter. So it creates an endless loop incrementing by "10" instead of a loop that increments by "1" ten times. As a minor point the trailing quit is not necessary to the loop, but is tidy in terms of a well contained line label.

5 . ObjectScript continue

Here the use of documentation is clearly confused the ObjectScript with IRIS BASIC language examples ( THEN keyword ). A query docs approach, possibly needs to use "ObjectScript" as a metadata filter or have upstream generated sets of help PDFs that are limited to a particular language implementation. Anticipating Python and Java examples could impose a similar effect. The use of "i%2" is python syntax for modular operator where as would be expecting "i#2" for object script.


Swapping out models

New models can be added by downloading GGUF format models to the models sub-directory from https://huggingface.co/

Here the naming convention contained "Q"+level to indicate quantization loss versus size. Where lower "Q" is effectively a smaller download model with more quality loss.

settings.yaml

local:
  llm_hf_repo_id: TheBloke/Mistral-7B-Instruct-v0.1-GGUF
  llm_hf_model_file: mistral-7b-instruct-v0.1.Q4_K_M.gguf
  #llm_hf_repo_id: TheBloke/Orca-2-13B-GGUF
  #llm_hf_model_file: orca-2-13b.Q6_K.gguf
  #llm_hf_repo_id: TheBloke/XwinCoder-34B-GGUF
  #llm_hf_model_file: xwincoder-34b.Q6_K.gguf
  embedding_hf_model_name: BAAI/bge-small-en-v1.5ssss

Using "LLM Chat" mode ( No query documents) with "xwincoder-34b" model, suggests much "code" recommendations can come from the existing trained model.

It demonstrated an interesting learned confusion between Globals and Routines which both are referenced by the carrot ( "^" ) .

The enthusiasm for "%" prefix for method name invocation may be learned invocation patterns from system class documentation instead of learning the feature of method name relates to invoking said method.

There are configuration references with system management that undertake actions in the %SYS namespace and this is generally quite separate from activities of third-party code.

It was interesting to see the invocation as well as implementation example to uncover such disparity ( Invoked as a Routine instead of class method ).

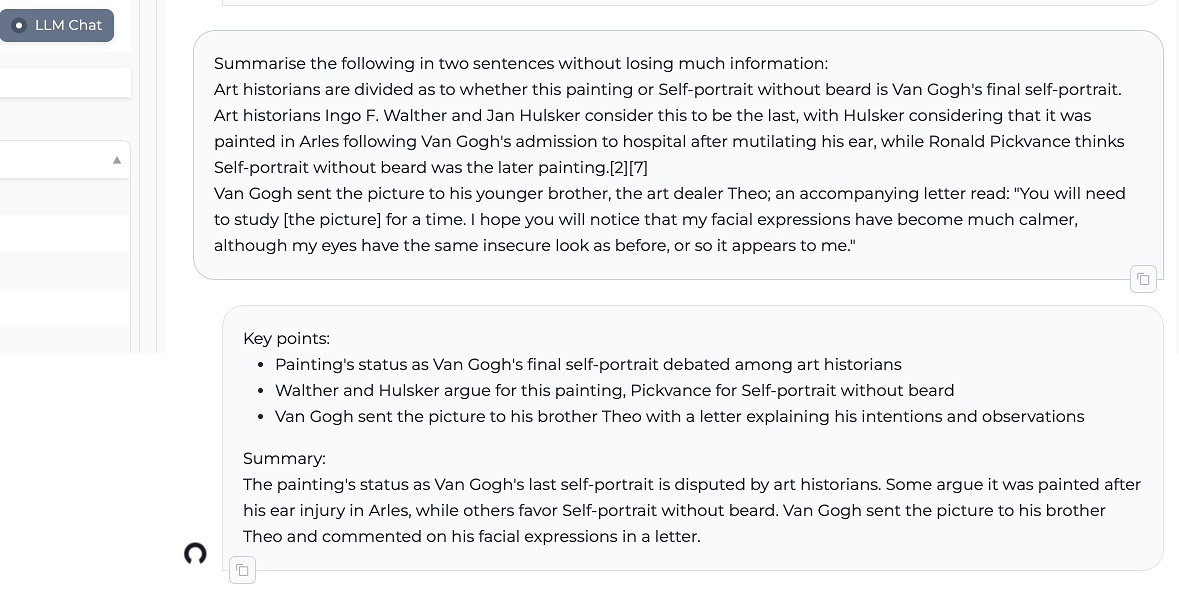
General Generative capabilities ( Model Orca 13b Q6 )

1. Generating questions and answers from supplied text

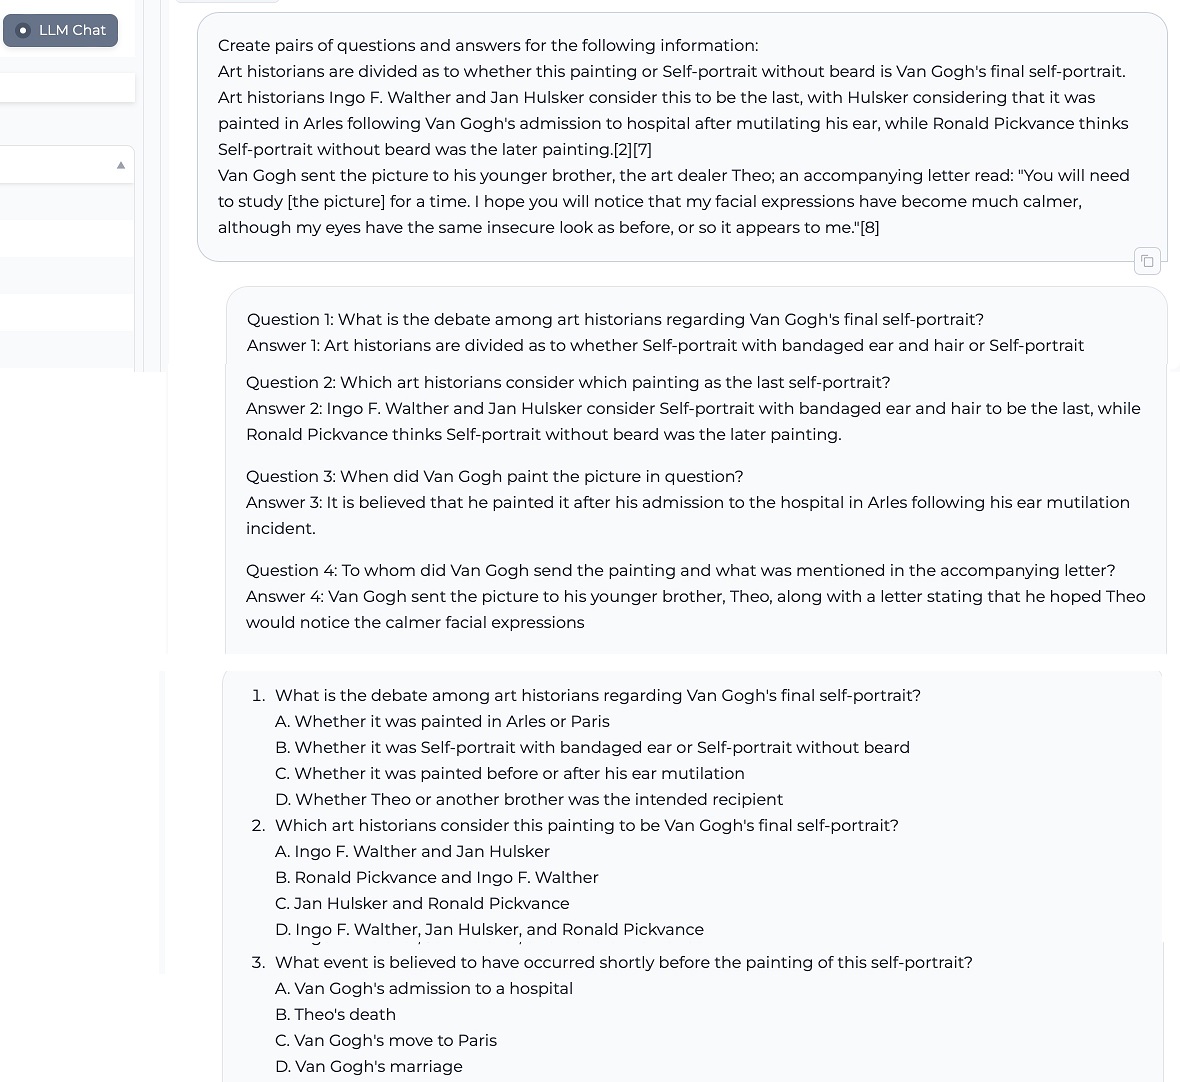
2. Explaining differences of concepts from supplied text

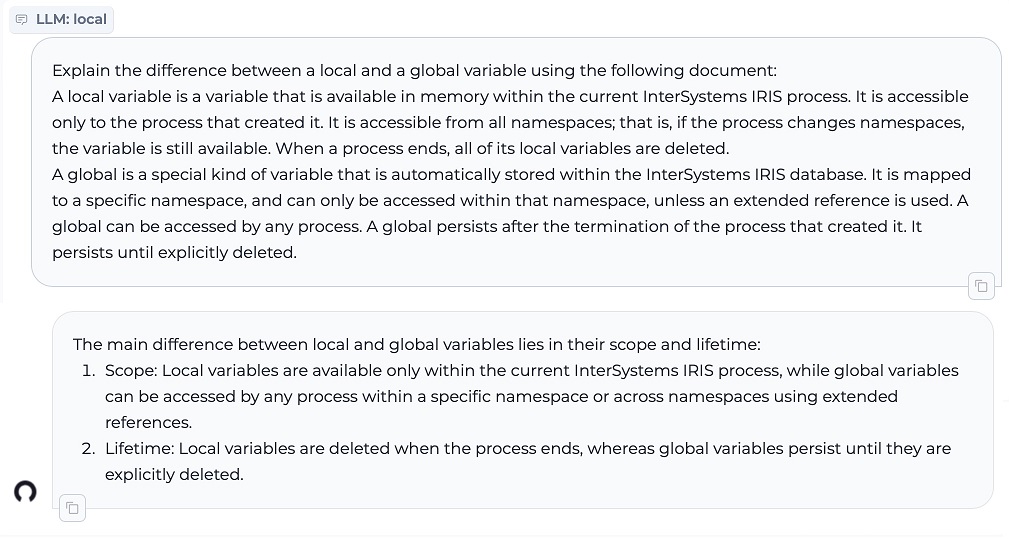
3. Summarizing information into a shorter form

Integrate with IRIS

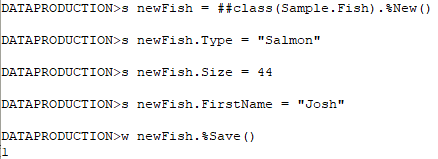
PrivateGPT can be put to work from IRIS by exercising available JSON end point with surprisingly little code.

The following code snippets demonstrate direct usage from ObjectScript.

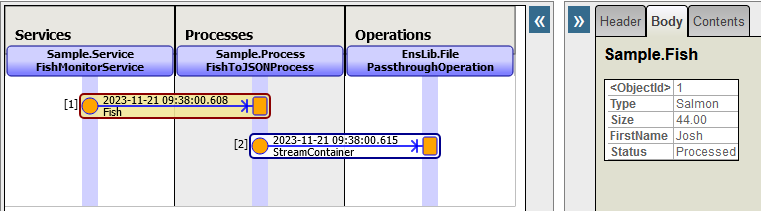
This can easily be wrapped by IRIS Integration Operations and Messages to provide a reusable facility with configuration, message trace, etc.,.

IRIS Conversation example

// Construct a request message via IRIS building Dynamic Object in ObjectScript
    // The property "use_context" = true, this ensures that preloaded documents are searched
    // for similarity, autoloaded into context to support response generation
    // The property "prompt", This is the full prompt provided to the LLM
    Set request={"use_context":true,"prompt":"What is an IRIS lock table"}
    // Using %Net.HttpRequest for direct access
    Set hr=##class(%Net.HttpRequest).%New()
    Set hr.Server="127.0.0.1"
    Set hr.Port=8001
    Set hr.ContentType="application/json"
   
    Do hr.SetHeader("Accept","application/json")
    // Embed the request as JSON
    Do hr.EntityBody.Write(request.%ToJSON())
    // Make request
    // The optional "2" argument causes the response to be output to the default device ( terminal )
    // Useful for analysing returned output
    Do hr.Post("/v1/completions",2)
    // The stream should already be rewound, but stated here
    // should stream need to be reused in testing
    Do hr.HttpResponse.Data.Rewind()
    // Turn the response back into IRIS %Dynamic Object
    Set response={}.%FromJSON(hr.HttpResponse.Data.Read(32000))
    // Grab the generated response
    Set outputMessage=response.choices.%Get(0).message
    // Grab the metadata for references used by generation
    Set outputSources=response.choices.%Get(0).sources.%Get(0).document
   
    Write !,"Output:",outputMessage.content
    Write !,"File reference:",outputSources."doc_metadata"."page_label"
    Write !,"Filename:",outputSources."doc_metadata"."file_name"

Example output:


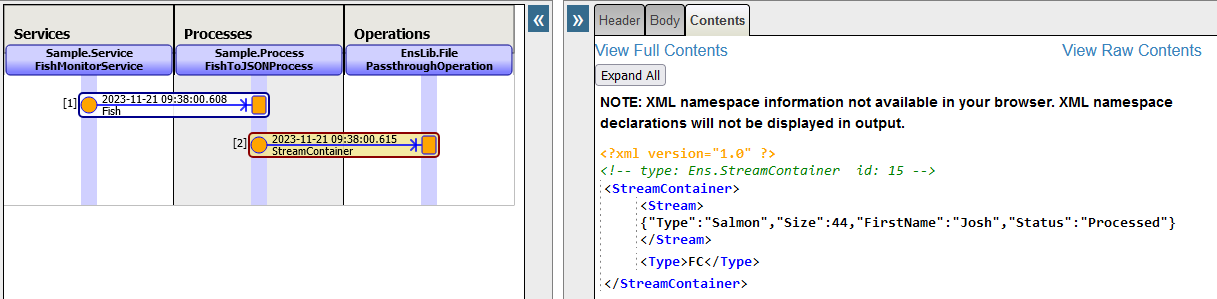
IRIS Retrieve Embedding Example

// Construct a request message via IRIS building Dynamic Object Construct
    Set textForEmbedding={"input":"This is some test text from IRIS database"}
    // Using %Net.HttpRequest for direct access
    Set hr=##class(%Net.HttpRequest).%New()
    Set hr.Server="127.0.0.1"
    Set hr.Port=8001
    Set hr.ContentType="application/json"
    Do hr.SetHeader("Accept","application/json")
    // Embedd the request as JSON
    Do hr.EntityBody.Write(textForEmbedding.%ToJSON())
    // Make request
    // The optional "2" argument causes the response to be output to the default device ( terminal )
    // Useful for analysing returned output
    Do hr.Post("/v1/embeddings",2)
    // The stream should already be rewound, but stated here
    // should stream need to be reused in testing
    Do hr.HttpResponse.Data.Rewind()
    // Turn the response back into IRIS %Dynamic Object
    Set response={}.%FromJSON(hr.HttpResponse.Data.Read(32000))
    // Example of iterator to loop over embeddings array
    Set iter=response.data.%Get(0).embedding.%GetIterator()
    // Output of floating point numbers of the returned embedding
    While iter.%GetNext(.key, .value, .type) {
        Write !,"key=",key,", value=",value,", type=",type
    }

Example output:

Further IRIS integration

The web API also supports:

  • dynamically loading new source documents
  • listing existing source document
  • deleting existing source documents
  • a health API to indicate availability

Further details available at: https://docs.privategpt.dev/api-reference/api-reference/ingestion

Summary thoughts and ideas

Local inference ( running quantized LLMs on laptop for productivity ) can be a useful way to initially scale the application of existing and internally retrained models. It allows flexibility for business users to privately explore and share new usercases and prompt engineering recipes.

To use PrivateGPT better for documentation, would need to delve deeper to reconfigure generative temperature lower, to reduce the creativity and improve accuracy of answers.

Technical Documentation and user manuals are no longer intended simply for human readers.

Can existing documentation pipelines be easily repurposed with metadata to shape documentation output that is better consumed and repurposed for generative AI?

A single documentation resource for multiple code languages makes it difficult to generalize usefully without conflating code examples. Hence hypothesis is that both documentation "code language" and "source retraining" of models would be better suited in short-term to be mono-code-language resources and assistants.

How well can retraining an existing model "unlearn" existing code conflations to be replaced with the useful and expected code syntax?

Hope this inspires new explorations.

References

Martínez Toro, I., Gallego Vico, D., & Orgaz, P. (2023). PrivateGPT [Computer software]. https://github.com/imartinez/privateGPT

Resources

https://github.com/imartinez/privateGPT

https://docs.privategpt.dev/

https://huggingface.co/models

https://github.com/ggerganov/llama.cpp

3 comentarios
Comentarios (3)2
Inicie sesión o regístrese para continuar
InterSystems Official
· 26 ene, 2024 Lectura de 2 min

Cómo instalar Apache en sistemas operativos compatibles con IRIS

Para vuestra comodidad, InterSystems está publicando los pasos de instalación característicos de los sistemas operativos que son compatibles con InterSystems IRIS.

Para Microsoft Windows, consultad por favor la documentación de producto de InterSystems.

El instalador de IRIS detectará si hay un servidor web instalado en la misma máquina, lo que da la opción de tener configurado automáticamente el servidor web.

Todas las instalaciones de Apache requerirán permiso de sudo (recomendado) o de root para instalar el servidor web. Este requisito es compatible con las mejores prácticas recomendadas.

Para Red Hat (RHEL), InterSystems está instalando ficheros SELinux para admitir conexiones a través de http o https (si están configuradas).

Opcionalmente los scritps proporcionan instrucciones sobre cómo convertir los pasos de instalación en un fichero ejecutable (el nombre del fichero solo es una recomendación).

InterSystems ofrece tres vídeos y un podcast con información adicional y ejemplos de uso.

Esperamos que el nuevo proceso os resulte rápido, sencillo y claro. Cambiar el procedimiento no fue una decisión fácil, pero era requerido a menudo por los clientes y está en línea con las mejores prácticas.

Una vez que hayáis cambiado del Servidor Web Privado, probablemente es tan fácil como instalar apps en vuestros dispositivos móviles.

Instrucciones de instalación

Fichero script para Ubuntu

# instalar o actualizar apache2

sudo apt install apache2 -y

# habilitar e iniciar httpd

sudo service apache2 start --now

apache2 -v

Fichero script para RedHat

# instalar o actualizar httpd

sudo dnf install httpd -y

# habilitar e iniciar httpd

sudo systemctl enable --now httpd

sudo systemctl start httpd

httpd -v

# Confirmar el estado SELinux (que debería ser ejecuado)

getenforce

Fichero script para AIX

# instalar o actualizar httpd

sudo yum install httpd -y

# iniciará httpd

sudo /etc/rc.d/init.d/httpd start

httpd -v

Fichero script para SUSE

#  instalar o actualizar apache2

sudo systemctl enable apache2

# habilitará e iniciará apache2

sudo systemctl restart apache2

systemctl status apache2

Comentarios (0)2
Inicie sesión o regístrese para continuar
Artículo
· 24 ene, 2024 Lectura de 9 min

Database Driven IRIS Production with Custom Inbound Adapters

The traditional use of an IRIS production is for an inbound adapter to receive input from an external source, send that input to an IRIS service, then have that service send that input through the production.

With a custom inbound adapter though, we can make an IRIS production do more. We can use an IRIS production to process data from our own database without any external trigger.

By using an IRIS production in this way your data processing tasks now get to leverage all the built in features of an IRIS production, including:

  • Advanced tracking and monitoring
  • Multithreaded processing for scalability
  • Configuration based business logic
  • Built-in IRIS operations to quickly connect to external systems
  • Quick recovery from system failures

The documentation for making a custom inbound adapter can be found at: https://docs.intersystems.com/hs20231/csp/docbook/DocBook.UI.Page.cls?KEY=EGDV_adv#EGDV_adv_adapterdev_inbound

Let’s look at 3 examples of a simple production configured to process “Fish” objects from a database.

In the first example we will make a data driven production that will continually process data.

In the second example we will modify this production to process data only during specific times.

In the third example we will modify this production to process data only when triggered via a system task.

Example 1: Continual Data Processing

This example is a simple production configured to continually process “Fish” objects from a database. All the production does is continually look for new fish objects, convert those fish objects to JSON, and then spit that JSON out to a file.

First, we make the Fish object we intend to process:

Class Sample.Fish Extends (%Persistent, Ens.Util.MessageBodyMethods, %JSON.Adaptor, %XML.Adaptor)
{

Parameter ENSPURGE As %Boolean = 0;
Property Type As %String;
Property Size As %Numeric;
Property FirstName As %String;
Property Status As %String [ InitialExpression = "Initialized" ];
Index StatusIndex On Status;
}

Status is important as that is how we will track unprocessed Fish from processed.

Setting ENSPURGE to 0 will prevent this object from being purged along with the message headers in the future.

Second, we make a custom adapter to look for new Fish:

Class Sample.Adapter.FishMonitorAdapter Extends Ens.InboundAdapter
{

/// Fish status value the adapter will query for. All matching fish will have their status set to SetFishStatus and then will be sent to the service.
Property GetFishStatus As %String [ InitialExpression = "Initialized", Required ];
/// Fish status value the service will set fish to before they are sent to the service.
Property SetFishStatus As %String [ InitialExpression = "Processed", Required ];
Parameter SETTINGS = "GetFishStatus:Basic,SetFishStatus:Basic";
Parameter SERVICEINPUTCLASS = "Sample.Fish";
Method OnTask() As %Status
{
	//Cursor to seach for any matching fish
	set getFishStatus = ..GetFishStatus
	&sql(declare fishCursor cursor for
		select ID into :fishId
		from Sample.Fish
		where Status = :getFishStatus)
	
	//Execute the cursor
	&sql(open fishCursor)
	for {
		&sql(fetch fishCursor)
		quit:SQLCODE'=0
		//For each matching fish, change its Status and send it to the service (BusinessHost)
		set fishObj = ##class(Sample.Fish).%OpenId(fishId)
		set fishObj.Status = ..SetFishStatus
		$$$ThrowOnError(fishObj.%Save())
		$$$ThrowOnError(..BusinessHost.ProcessInput(fishObj))
	}
	&sql(close fishCursor)
	if SQLCODE < 0 {
		throw ##class(%Exception.SQL).CreateFromSQLCODE(SQLCODE,%msg)
	}
	
	quit $$$OK
}

The OnTask() method searches for any fish matching the configured GetFishStatus value. For each fish it finds it changes its status to the configured SetFishStatus value and then passes it to the service’s ProcessInput method.

Third, we make a custom service to use this adapter:

Class Sample.Service.FishMonitorService Extends Ens.BusinessService
{

/// Configuration item to which to send messages
Property TargetConfigName As Ens.DataType.ConfigName;
Parameter SETTINGS = "TargetConfigName:Basic";
Parameter ADAPTER = "Sample.Adapter.FishMonitorAdapter";
Method OnProcessInput(pInput As Sample.Fish, pOutput As %RegisteredObject) As %Status
{
    quit:..TargetConfigName=""
    //Send fish to configured target
    quit ..SendRequestAsync(..TargetConfigName, pInput)
}

}

This service takes fish as input and passes them via an async request to the configured target.

Fourth, we make a custom business process to convert the fish to JSON.

Class Sample.Process.FishToJSONProcess Extends Ens.BusinessProcess
{

/// Configuration item to which to send messages
Property TargetConfigName As Ens.DataType.ConfigName;
Parameter SETTINGS = "TargetConfigName:Basic";
Method OnRequest(pRequest As Sample.Fish, Output pResponse As Ens.Response) As %Status
{
	//Convert the fish to a JSON stream
	do pRequest.%JSONExportToStream(.jsonFishStream)
	//Make a new stream container with JSON stream
	set tRequest = ##class(Ens.StreamContainer).%New(jsonFishStream)
	//Send stream container to configured target
	quit ..SendRequestAsync(..TargetConfigName, tRequest, 0)
}

Method OnResponse(request As Ens.Request, ByRef response As Ens.Response, callrequest As Ens.Request, callresponse As Ens.Response, pCompletionKey As %String) As %Status
{
    quit $$$OK
}

}

The OnRequest() method is the only one that does anything. It accepts fish, generates a JSON stream from the fish, packages that stream into a Ens.StreamContainer, and then passes that stream container via an async request to the configured target.

Finally, we configure the production:

Class Sample.DataProduction Extends Ens.Production
{

XData ProductionDefinition
{
<Production Name="Sample.DataProduction" LogGeneralTraceEvents="false">
  <Description></Description>
  <ActorPoolSize>2</ActorPoolSize>
  <Item Name="Sample.Service.FishMonitorService" Category="" ClassName="Sample.Service.FishMonitorService" PoolSize="1" Enabled="true" Foreground="false" Comment="" LogTraceEvents="false" Schedule="">
    <Setting Target="Host" Name="TargetConfigName">Sample.Process.FishToJSONProcess</Setting>
  </Item>
  <Item Name="Sample.Process.FishToJSONProcess" Category="" ClassName="Sample.Process.FishToJSONProcess" PoolSize="1" Enabled="true" Foreground="false" Comment="" LogTraceEvents="false" Schedule="">
    <Setting Target="Host" Name="TargetConfigName">EnsLib.File.PassthroughOperation</Setting>
  </Item>
  <Item Name="EnsLib.File.PassthroughOperation" Category="" ClassName="EnsLib.File.PassthroughOperation" PoolSize="1" Enabled="true" Foreground="false" Comment="" LogTraceEvents="false" Schedule="">
    <Setting Target="Adapter" Name="FilePath">C:\temp\fish\</Setting>
  </Item>
</Production>
}

}

All that is left to do is to test it. For this we just need to open a terminal window and make a new fish object.

Looking at the production messages we can see the fish was found and processed:

We can inspect the trace of both messages:

And looking at the output folder (C:\temp\fish\) we can see the output file:


Example 2: Schedule-Based Data Processing

For use cases where we only want to process data at specific times, like overnight, we can configure the service to run on a schedule.

To modify example 1 to run on a schedule we first make a Schedule Spec. The documentation on how to do this can be found here: https://docs.intersystems.com/iris20231/csp/docbook/DocBook.UI.PortalHelpPage.cls?KEY=Ensemble%2C%20Schedule%20Editor

Then we change the service configuration to use this schedule:

Class Sample.DataProduction Extends Ens.Production
{

XData ProductionDefinition
{
<Production Name="Sample.DataProduction" LogGeneralTraceEvents="false">
  <Description></Description>
  <ActorPoolSize>2</ActorPoolSize>
  <Item Name="Sample.Service.FishMonitorService" Category="" ClassName="Sample.Service.FishMonitorService" PoolSize="1" Enabled="true" Foreground="false" Comment="" LogTraceEvents="false" Schedule="@Midnight Processing">
    <Setting Target="Host" Name="TargetConfigName">Sample.Process.FishToJSONProcess</Setting>
  </Item>
  <Item Name="Sample.Process.FishToJSONProcess" Category="" ClassName="Sample.Process.FishToJSONProcess" PoolSize="1" Enabled="true" Foreground="false" Comment="" LogTraceEvents="false" Schedule="">
    <Setting Target="Host" Name="TargetConfigName">EnsLib.File.PassthroughOperation</Setting>
  </Item>
  <Item Name="EnsLib.File.PassthroughOperation" Category="" ClassName="EnsLib.File.PassthroughOperation" PoolSize="1" Enabled="true" Foreground="false" Comment="" LogTraceEvents="false" Schedule="">
    <Setting Target="Adapter" Name="FilePath">C:\temp\fish\</Setting>
  </Item>
</Production>
}

}

Now when we look at this “Jobs” tab of the service we see there are no jobs running:

Form now on this service will only ever have jobs running between the hours of midnight and 1AM.


Example 3: Event-Based Data Processing with Task Manager

For use cases where we only want to process data once at a specific time or when a particular event takes place, we can configure the service to only execute when a system task is run.

To modify example 1 to run only when triggered by a task we first make a custom task to trigger the service.

Class Sample.Task.TriggerServiceTask Extends %SYS.Task.Definition
{

/// The name of the Business Service this task should run.
Property BuinessServiceName As %String [ Required ];
Method OnTask() As %Status
{
	#dim pBusinessService As Ens.BusinessService
	$$$ThrowOnError(##class(Ens.Director).CreateBusinessService(..BuinessServiceName, .pBusinessService))
	Quit pBusinessService.OnTask()
}

}

Second, we configure a new system task. Documentation on how to configure system tasks can be found here: https://docs.intersystems.com/iris20233/csp/docbook/Doc.View.cls?KEY=GSA_manage_taskmgr

This is the custom part of the configuration process for this example is:

In addition, I am configuring the task to be an on-demand task, but you could set up a schedule instead.

Finally, we configure the production:

Class Sample.DataProduction Extends Ens.Production
{

XData ProductionDefinition
{
<Production Name="Sample.DataProduction" LogGeneralTraceEvents="false">
  <Description></Description>
  <ActorPoolSize>2</ActorPoolSize>
  <Item Name="Sample.Service.FishMonitorService" Category="" ClassName="Sample.Service.FishMonitorService" PoolSize="0" Enabled="true" Foreground="false" Comment="" LogTraceEvents="false" Schedule="">
    <Setting Target="Host" Name="TargetConfigName">Sample.Process.FishToJSONProcess</Setting>
  </Item>
  <Item Name="Sample.Process.FishToJSONProcess" Category="" ClassName="Sample.Process.FishToJSONProcess" PoolSize="1" Enabled="true" Foreground="false" Comment="" LogTraceEvents="false" Schedule="">
    <Setting Target="Host" Name="TargetConfigName">EnsLib.File.PassthroughOperation</Setting>
  </Item>
  <Item Name="EnsLib.File.PassthroughOperation" Category="" ClassName="EnsLib.File.PassthroughOperation" PoolSize="1" Enabled="true" Foreground="false" Comment="" LogTraceEvents="false" Schedule="">
    <Setting Target="Adapter" Name="FilePath">C:\temp\fish\</Setting>
  </Item>
</Production>
}

}

Note that we set the PoolSize of Sample.Service.FishMonitorService to 0.

All that is left to do is to test it. For this we just need to open a terminal window and make a new fish object.

Looking at the production messages we can see the fish has not been processed yet:

Then we run the on-demand task to trigger the service:

Now looking at the production messages we can see the service was triggered causing the fish to be found and processed:

We can inspect the trace of both messages:

And looking at the output folder (C:\temp\fish\) we can see the output file:


Conclusion

The above examples are quite simple. You could configure the productions to do far more though. Including…

Basically, anything that could be done in a typical IRIS production could be done here too.

1 Comentario
Comentarios (1)1
Inicie sesión o regístrese para continuar
Anuncio
· 23 ene, 2024

GenAI Crowdsourcing Mini-Contest by InterSystems Innovation Acceleration Program

Hi Community,

Thank you for participating in our recent mini-contest! We received many great ideas, and we hope you enjoyed the process.

The mastermind of the winning concept will receive 5,000 points, while the astute "investors" in said concept will receive 200 points each.


The Winning Concept: Senior people loneliness

 Loneliness experiences by older people and lack of conversations can negatively impact their mental well-being, concerning their families about difficulties in being able to ask for help on their own.

The Mastermind: Marcelo Dotti

The astute "investors":

Cecilia Brown, Danny, Udo, Lars Barlow-Hansen, Ahmed Tgarguifa, Jimmy N., Dinesh Babu

Congratulations to all!

Comentarios (0)1
Inicie sesión o regístrese para continuar
Artículo
· 22 ene, 2024 Lectura de 7 min

KMS . Introduction to its use in IRIS and an example of setup on AWS EC2 system

IRIS can use a KMS (Key Managment Service) as of release 2023.3.  Intersystems documentation is a good resource on KMS implementation but does not go into details of the KMS set up on the system, nor provide an easily followable example of how one might set this up for basic testing.

The purpose of this article is to supplement the docs with a brief explanation of KMS, an example of its use in IRIS, and notes for setup of a testing system on AWS EC2 RedHat Linux system using the AWS KMS.  It is assumed in this document that the reader/implementor already has access/knowledge to set up an AWS EC2 Linux system running IRIS (2023.3 or later), and that they have proper authority to access the AWS KMS and AWS IAM (for creating roles and polices), or that they will be able to get this access either on their own or via their organizations Security contact in charge of their AWS access.

What is KMS and what does it do for IRIS?:

KMS means Key Management Service.   Briefly, it provides an external secure method of encrypting and decrypting IRIS encryption keys through a trusted service, the KMS.

In prior implementation, when using unattended startup, IRIS would never store unencrypted encryption keys; IRIS would encrypt a key with an encrypted copy of the key encryption key in that key itself.  It would then store a user ID and password in IRIS to unencrypt the encrypted key encryption key.  This leaves an unencrypted copy of the user ID and password stored in an IRIS database, which leaves extra burden on IRIS managers of securing that.  The key encryption key is encrypted/decrypted by a symmetric key that is based on a key admin’s password using PBKDF2 (Password-Based Key Derivation Function 2). So the key that encrypts the key encryption key is never stored anywhere – it’s derived on the fly when a key admin supplies their password. Since there can be multiple admins for keys in a given key file we store in the key file one encrypted copy of the key encryption key (per admin) and then a single encrypted copy of each database/data element encryption key (encrypted with the key encryption key).
 

With KMS we do not store the id and password in IRIS.  When we create the encryption key with KMS we get an encrypted encryption key, and the KMS keeps the key encryption key for us. We reach out to the kms server with the encrypted encryption key.  the kms server decrypts the encryption key.  The decrypted key is sent back to us and stored in memory.  The communications are secured using TLS.

We don't ever have access to the raw key encryption key.  We use it as a service via kms.  The key encryption key stays on the kms server.  This helps with key management and key security.


Current implementation (as of 1/22/2024) of KMS is Cloud Vendor Specific

In AWS you must specify creation of a symmetric key. 

In Azure you must specify creation of an RSA key

Future implementation my include google KMS.


---

Example of workflow setting up new encryption key in IRIS using KMS:

The following assumes you have set up an IRIS system to access an AWS KMS server and your instance has been authorized to access the keys there and you have set up a key for use.  (See Setup Notes following this example for an example of setting up KMS on AWS to connect with an AWS EC2 RedHat Linux instance.)


1.%SYS>D ^EncryptionKey

2.Create New Key

3.Name the key

4.Use KMS: yes

      Here you specify properties of the key.  Choose backup if you want a regular encryption key made to backup this KMS key.  This is the only place you can do this.  Treat this backup as you would a normal Encryption key. 

5. Select AWS for the kms server

6. Get the key ID and the region from your AWS Key Managed Service console

7. Env Key ; you should not need to specify anything here if your system is set up correctly (per this article). See AWS docs for further details if necessary for your needs.  Leave blank for the purpose of simplifying this for testing example.

8. You should receive a message like:

Encryption key file created: iriskmstest1
Encryption key created via KMS: 87A85627-9F8C-11EE-8839-0608ECAD1BAF

This key is NOT activated.


Key Activation and use are then usual encryption key setup steps.


If there are issues with the activation at startup it will error and go into interactive mode

For interactive startup if you pass in a kms key it will not prompt for username or password

If you put in the backup key (generated in step 14 above) then it will ask for the username and password you created at key creation time (just like normal key)

If there are issues you will see errors in your startup, or logged in messages.log if silent startup.


In general, your IRIS system does not need to be on AWS or other cloud system, it accesses the KMS for the key over TLS.

IRIS uses credentials of current user when accessing the KMS server, so you need to make sure that user has access to KMS

the AWS key policy defines who can use the key on AWS.  See following setup notes for an example.


----

Setup Notes: Getting an AWS EC2 Linux system running IRIS to work with an AWS KMS:

(The following assumes you already have an AWS EC2 RedHat Linux system running an IRIS version that supports KMS)


To set up the AWS EC2 system to use the AWS KMS server:

Follow Setup instructions in following link to install the AWS CLI on your EC2 system:  Install or update the latest version of the AWS CLI - AWS Command Line Interface (amazon.com) 

There are instructions for different OS types.  For the purpose of this instruction set I used an AWS RedHat Linux system.  It was fairly strait forward to follow that doc to install the AWS CLI on the system.

I also had to use 'sudo yum install unzip' to install unzip on the system in order to follow the instructions which had me use unzip on the AWS client download zip file.


Here are the steps to create a key that could be used by an IRIS instance for encryption key encryption:

1. In AWS Mgmnt Console go to Key Management Service.

2. Click on Customer Managed Keys

3. Click on Create Key

5. Accept the Defaults

6. Enter an Alias; this is the name for the key

7.Key Admin Options: default policy

8. Click Finish


The IRIS instance will also need to be authorization to use the KMS key. This is done either by running the instance as a user who has authenticated to AWS and is authorized to use the key, specifying a credentials file with the AWS_SHARED_CREDENTIALS_FILE environment variable or by assigning to the EC2 itself an IAM role that either has a policy attached to it that allows key usage or that has an explicit allowance specified in the key policy itself.

For the purpose of this instruction set we are following the 3rd as ISC Development has suggested this would be the most commonly used by customers in AWS.  In the following we will create an IAM role that can be assigned to the EC2 instance itself. The role can have a policy attached to it that gives it very targeted privileges to access a given key in the KMS (or even just allow specific operations with the key).  We are only exploring the most simple process to give us something to use for testing...


Here are the steps for Authorizing an Instance of IRIS on an AWS EC2 system to use the key on the KMS server:

1.In AWS Managment Console go to Key Management Service

2. Under "Customer managed keys" click on the Key ID of the key you want to use.

3. In the "General configuration" section click the "Copy" icon next to the ARN to copy the ARN to the clipboard. Paste this value somewhere to use later in the policy configuration.

4. In AWS Mgmnt Console go to IAM.
5. Under "Access Management">"Policies" click "Create policy".
6. Under "Select a service" choose KMS from the drop-down list. Click "Next".
7. Under "Actions allowed" click on the "Write" access level expander. Check the "Decrypt" and "Encrypt" checkboxes.
8. Under "Resources" click on the "Add ARNs" link.
9. Paste the entire ARN from Step 3 above into the "Resource ARN" text field. Click "Add ARNs". Click "Next".
10. Under "Policy details" provide a policy name and, if desired, a policy description. Click "Create policy".

11. In IAM under "Access Management">"Roles" click "Create role".
12. Under "Trusted entity type" click "AWS service". Under "Use case" select EC2 from the drop-down list. Click "Next".
13. Under "Permissions policies" start typing the policy name from Step 10 until it appears in the list. Click the checkbox next to it. Click "Next".
14. Under "Role details" provide a role name. Click "Create role".

15. In AWS Mgmnt Console go to EC2. Navigate to "Instances">"Instances".
16. If EC2 instance already exists:
    a. Click checkbox next to instance name.
    b. Click "Actions">"Security">"Modify IAM role".
    c. Choose the role from Step 15 from the drop-down list.
    d. Click "Update IAM role".
16. If launching new EC2 instance:
    a. Click "Launch instances".
    b. Under "Advanced details" choose role from Step 15 in "IAM instance profile" drop-down list.

17.You can now use the kms key in ^EncryptionKey


Notes:
 After creating policy/role you might need to refresh the Mgmt Console for these new resources to show up.


---


Supplemental:

Classes methods of interest:

%SYSTEM.Encryption.KMSCreatEncryptionKey()

%SYSTEM.Encryption.ActivateEncryptionKey() ;just supply the kms key, no need for username or password

do ReadFile^EncryptionKey(<key>,.data) zw data ;it will be obvious if the key is kms type from the data returned.


Doc link:

Key Management Tasks | InterSystems IRIS for Health 2023.3

Comentarios (0)1
Inicie sesión o regístrese para continuar